1.15 NPN Transistor Switch
Now let’s explore transistors - the fundamental building blocks of all digital electronics! A transistor acts like an electronic switch that can be controlled by a small signal to switch much larger currents.
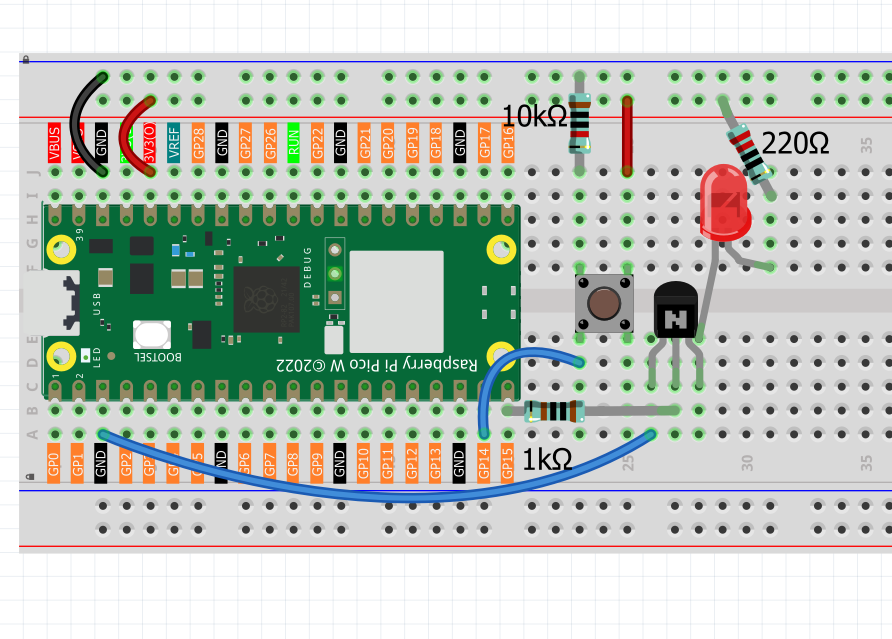
We’re using an S8050 NPN transistor. Think of it as a water valve: a small control signal at the “base” can turn on/off a much larger current flow between “collector” and “emitter”. This lets our tiny Pico control bigger devices like motors, lights, or fans!
Component List
Raspberry Pi Pico W x1
MicroUSB cable x1
830 Tie-Points Breadboard x1
Jumper Wire Several
Resistor 220Ω, 1KΩ, 10KΩ x1
LED x1
Transistor S8050 x1
Component knowledge
Transistor
How our transistor switch works:
Control Logic: - Button pressed → GP14 reads HIGH → GP15 outputs HIGH → Transistor turns ON → LED lights up - Button released → GP14 reads LOW → GP15 outputs LOW → Transistor turns OFF → LED goes dark
Why use a transistor? Instead of connecting the LED directly to the Pico, the transistor acts as a “relay” that can handle higher currents safely, protecting our microcontroller.
Connect
Code
Note
Open the
1.15_npn_transistor_switch.inofile under the path ofUltimate-Starter-Kit-for-Pico-W\Arduino\1.Projector copy this code into Thonny, then click “Run Current Script” or simply press F5 to run it.Or copy this code into Arduino IDE.
Don’t forget to select the board(Raspberry Pi Pico) and the correct port before clicking the Upload button.
After running the code, press the button to toggle the LED on and off. The serial monitor shows detailed transistor switching status, including press counts and whether the “high current device” (LED) is active or inactive. Perfect for learning transistor switching principles!
The following is the program code:
/*
  Transistor Switch Control

  Uses a button to control a transistor switch that can
  drive higher current devices like motors or lights.
*/

// Pin definitions
const int BUTTON_PIN = 14;          // button input pin
const int TRANSISTOR_PIN = 15;      // transistor control pin
const int CHECK_DELAY = 50;         // button check interval

// Variables for button state tracking
bool buttonPressed = false;
bool lastButtonState = false;
bool deviceOn = false;
int pressCount = 0;

void setup() {
  // Set up pins
  pinMode(BUTTON_PIN, INPUT);
  pinMode(TRANSISTOR_PIN, OUTPUT);

  // Initialize serial communication
  Serial.begin(115200);
  Serial.println("=== Transistor Switch Control ===");
  Serial.println("Press button to toggle device ON/OFF");
  Serial.println("Transistor acts as electronic switch");
  Serial.println();

  // Ensure device starts OFF
  digitalWrite(TRANSISTOR_PIN, LOW);
  Serial.println("Device: OFF (Ready)");
}

void loop() {
  // Check button and control transistor
  handleButtonControl();

  // Small delay for stable operation
  delay(CHECK_DELAY);
}

// Function to handle button press and transistor control
void handleButtonControl() {
  // Read current button state
  buttonPressed = digitalRead(BUTTON_PIN);

  // Detect button press (transition from LOW to HIGH)
  if (buttonPressed && !lastButtonState) {
    // Toggle device state
    deviceOn = !deviceOn;
    pressCount++;

    // Control transistor switch
    digitalWrite(TRANSISTOR_PIN, deviceOn ? HIGH : LOW);

    // Display status
    Serial.print("Button pressed (#");
    Serial.print(pressCount);
    Serial.print(") - Device: ");
    Serial.println(deviceOn ? "ON" : "OFF");

    if (deviceOn) {
      Serial.println("Transistor conducting - High current device active");
    } else {
      Serial.println("Transistor off - High current device inactive");
    }
    Serial.println();
  }

  // Update last button state for next comparison
  lastButtonState = buttonPressed;
}