6.9 Touch Keyboard_Chaser
Create a mesmerizing interactive light show that responds to your touch! This project combines capacitive touch sensing with stunning LED animations to create a “ripple effect” that spreads across a colorful LED strip whenever you touch different points.
✨ What You’ll Create: An advanced touch-controlled lighting system that creates beautiful ripple animations - like throwing stones into a calm pond, but with light! Each touch creates a wave of light that spreads outward from that point across the LED strip.
🎯 How It Works: - 12 Touch Points: The MPR121 sensor detects touches on 12 different electrodes - 8-LED Light Strip: WS2812 addressable LEDs create the visual effects - Ripple Animation: Light waves spread outward from the touch point - Smart Mapping: Touch points 0-7 correspond to LED positions on the strip
🌊 The Magic Ripple Effect: When you touch electrode 0, a light pulse starts at LED 0 and ripples outward. Touch electrode 4, and the wave begins from the center of the strip. Each touch point creates its own unique wave pattern!
🎨 Perfect For: - Interactive art installations - Touch-responsive decorations - Learning about capacitive sensing and LED control - Creating ambient lighting that responds to presence - Impressing friends with futuristic touch interfaces
🔬 The Science Behind Touch Sensing:
⚡ Capacitive Touch Technology: The MPR121 uses the same technology as smartphone screens! It measures tiny changes in electrical charge when conductive objects (like your finger) get close to or touch the electrodes.
🌈 LED Strip Magic: The WS2812 LED strip contains individually addressable LEDs - each one can display any color and be controlled separately. This allows for complex animations where light “flows” from one LED to the next.
🎭 Animation Algorithm: When you touch electrode 3, the system calculates which LED corresponds to that position, then creates a expanding circle of light that spreads outward at precise timing intervals (65ms between frames).
Component List
Raspberry Pi Pico W x1
MicroUSB cable x1
830 Tie-Points Breadboard x1
MPR121 Module x1 (12-channel capacitive touch sensor)
WS2812 LED Strip x1 (8 addressable LEDs)
Jumper Wire Several
💡 Touch Interface Setup: Instead of fruits, this project uses the MPR121’s built-in electrodes as touch points. You can: - Touch directly: Use your finger on the electrode pads - Extend electrodes: Connect wires to create remote touch points - Creative conductors: Attach to metal objects, foil, or even fruits for artistic installations
🔧 How the MPR121 Works: 1. Initialization: Each electrode gets calibrated to its baseline electrical state 2. Touch detection: When you approach/touch an electrode, the electrical field changes 3. Signal processing: The MPR121 detects this change and reports which electrode was touched 4. Animation trigger: Your Pico receives the touch data and starts the corresponding light animation
⚠️ Important Setup Tips: - Keep electrodes stable during initialization for accurate calibration - Avoid touching electrodes while the system starts up - Ensure good electrical connections for reliable touch detection
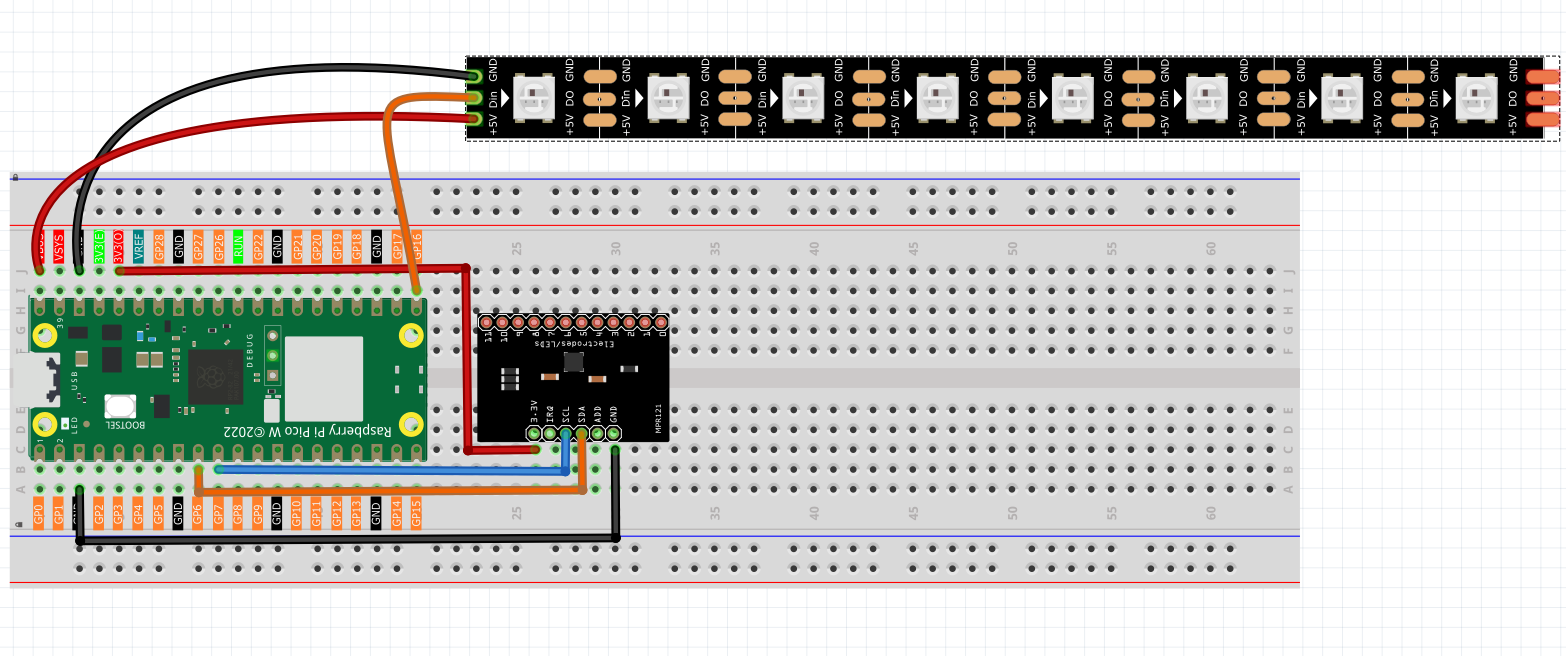
Connect
Code
Note
Open the
6.9_touch_keyboard_chaser.pyfile under the path ofUltimate-Starter-Kit-for-Pico-W\Python\1.Projector copy this code into Thonny, then click “Run Current Script” or simply press F5 to run it.Don’t forget to click on the “MicroPython (Raspberry Pi Pico)” interpreter in the bottom right corner.
After running the code, get ready for a stunning interactive light show! Here’s how to experience your touch-controlled ripple effects:
🚀 Getting Started: 1. Wait for initialization - Don’t touch anything while the system calibrates (about 2-3 seconds) 2. Look for the ready message - “Ready for touch!” appears when calibration is complete 3. Start creating ripples - Touch any electrode (0-7) and watch the magic happen!
🌊 What You’ll Experience: - Touch electrode 0 → Light ripple starts from the first LED and spreads right - Touch electrode 4 → Ripple begins from the center and spreads both ways - Touch electrode 7 → Wave starts from the last LED and spreads left - Beautiful blue waves → Each ripple uses a gorgeous blue color (50, 150, 255 RGB)
🎮 Interactive Features: - Instant response: Touch detection happens in real-time - Smooth animations: 65ms frame timing creates fluid wave motion - Smart mapping: Only electrodes 0-7 trigger animations (matches 8-LED strip) - Wave physics: Each ripple spreads outward from the touch point like real water waves - Auto-reset: LEDs automatically turn off after each animation completes
🧪 Fun Experiments: - Try different touch points - Each creates a unique wave pattern - Touch multiple electrodes - See how the system handles simultaneous touches - Timing experiments - Touch rapidly to see overlapping animations - Creative extensions - Connect wires to electrodes for remote touch points
💡 Pro Tips: - The system only responds to new touches, not continuous holding - Electrodes 8-11 are detected but don’t trigger animations (outside LED range) - For best results, ensure stable electrical connections during setup
Ready to create your own light symphony? Every touch is a new masterpiece! ✨
The following is the program code:
# 6.9_touch_keyboard_chaser.py
#
# This project uses an MPR121 capacitive touch sensor to trigger
# a "chaser" or "ripple" light effect on a WS2812 LED strip.
# Touching a key on the sensor creates a light pulse that
# spreads outwards from that point.
#
# Combines logic from:
# - 3.3_touch_keyboard.py (for MPR121 input)
# - 6.13_rfid_player.py (for WS2812 output)

from machine import Pin, I2C
from mpr121 import MPR121
from ws2812 import WS2812
import time

# --- Configuration ---
# MPR121 Touch Sensor Config (uses I2C bus 0)
I2C_SDA_PIN = 6
I2C_SCL_PIN = 7

# WS2812 LED Strip Config
WS2812_PIN = 16  # The GPIO pin connected to the data line of the LED strip
NUM_LEDS = 8    # The number of LEDs on the strip

# Animation Config
ANIMATION_SPEED_MS = 65  # Time in milliseconds between animation frames. Lower is faster.
ANIMATION_COLOR_RGB = (50, 150, 255) # A nice blue color (R, G, B) for the light effect.

class TouchChaser:
    """
    Manages the touch sensor and LED strip to create interactive light effects.
    """
    def __init__(self):
        """Initializes all hardware components and state variables."""
        print("Initializing Touch Keyboard Chaser...")

        # 1. Initialize I2C and MPR121 Touch Sensor
        self.i2c = I2C(1, sda=Pin(I2C_SDA_PIN), scl=Pin(I2C_SCL_PIN))
        self.mpr = MPR121(self.i2c)

        # 2. Initialize WS2812 LED Strip
        self.led_strip = WS2812(Pin(WS2812_PIN), NUM_LEDS)

        # 3. State tracking to detect new presses
        self.last_touched_keys = []

        # Convert RGB tuple to a single integer for the ws2812 library
        # The library typically expects colors in Green, Red, Blue (GRB) order.
        r, g, b = ANIMATION_COLOR_RGB
        self.animation_color_int = (g << 16) | (r << 8) | b

        self.clear_leds()
        print("Initialization complete. Ready for touch!")

    def clear_leds(self):
        """Turns all LEDs on the strip off."""
        for i in range(NUM_LEDS):
            self.led_strip[i] = 0
        self.led_strip.write()

    def play_ripple_animation(self, origin):
        """
        Plays the light animation, spreading outwards from a given origin point.

        Args:
            origin (int): The index of the LED where the animation should start.
        """
        print(f"Animation triggered from key {origin}")

        # Calculate how far the ripple needs to spread to cover the whole strip
        max_distance = max(origin, NUM_LEDS - 1 - origin)

        for distance in range(max_distance + 1):
            # In each frame, update the entire strip
            for i in range(NUM_LEDS):
                # Calculate this LED's distance from the origin
                dist_from_origin = abs(i - origin)

                # Light up the LED if it's at the current wavefront
                if dist_from_origin == distance:
                    self.led_strip[i] = self.animation_color_int
                else:
                    self.led_strip[i] = 0 # Turn all other LEDs off

            self.led_strip.write()
            time.sleep_ms(ANIMATION_SPEED_MS)

        # Hold the final frame briefly before clearing the strip
        time.sleep_ms(200)
        self.clear_leds()

    def run(self):
        """The main loop that continuously checks for touches and runs animations."""
        while True:
            current_touched_keys = self.mpr.get_all_states()

            # A "new touch" is when the current state is not empty and is different from the last state.
            # This triggers the animation only on the initial press, not while holding.
            is_new_touch = bool(current_touched_keys) and (current_touched_keys != self.last_touched_keys)

            if is_new_touch:
                # We use the first key in the list if multiple are touched simultaneously.
                origin_key = current_touched_keys[0]

                # Map the 12 keys of the MPR121 to the 8 LEDs on the strip.
                # We only care about the first 8 keys (0-7).
                if 0 <= origin_key < NUM_LEDS:
                    self.play_ripple_animation(origin_key)
                else:
                    print(f"Info: Touched key {origin_key} is outside the LED strip range (0-{NUM_LEDS-1}).")

            # Update the state for the next cycle
            self.last_touched_keys = current_touched_keys

            # A small delay to keep the system responsive without overwhelming the CPU
            time.sleep_ms(20)

def main():
    """The main entry point of the program."""
    try:
        chaser_app = TouchChaser()
        chaser_app.run()
    except KeyboardInterrupt:
        print("\nProgram stopped by user.")
        # Create a temporary object to turn off LEDs on exit
        # This ensures the strip is dark even if the program is stopped mid-animation.
        try:
            temp_led_strip = WS2812(Pin(WS2812_PIN), NUM_LEDS)
            for i in range(NUM_LEDS):
                temp_led_strip[i] = 0
            temp_led_strip.write()
        except Exception as e:
            print(f"Could not turn off LEDs on exit: {e}")
    except Exception as e:
        print(f"\nAn unexpected error occurred: {e}")
    finally:
        print("Shutting down.")

if __name__ == "__main__":
    main()