6.2 Electronic Thermometer
Build your own smart weather station that displays real-time temperature and humidity on a beautiful LCD screen! This is like having a professional weather monitor right on your desk.
Why is this cool? Instead of just reading numbers in the serial monitor, you’ll create a standalone device with its own display that anyone can read at a glance. Perfect for monitoring your room comfort, greenhouse conditions, or just impressing friends with your own weather station!
What makes it special: This project combines two powerful sensors - the DHT11 for precise temperature and humidity readings, plus an LCD display that makes your data visible to everyone. It’s like upgrading from a basic thermometer to a digital weather display!
Project Features: - 📊 Real-time monitoring: Updates temperature and humidity every 2 seconds - 🖥️ Clear LCD display: No need for a computer - readings shown directly on screen - 🌡️ Dual sensor data: Both temperature (°C) and humidity (%) in one device - 🔄 Auto-refresh: Display automatically updates with latest readings - ⚡ Error handling: Shows helpful messages if sensor has issues
How it works: The DHT11 sensor measures both temperature and humidity from the air around it, then sends this data digitally to your Pico. The LCD screen displays this information in an easy-to-read format, creating a professional-looking weather station!
Component List
Raspberry Pi Pico W x1
MicroUSB cable x1
830 Tie-Points Breadboard x1
LCD1602 IIC x1
DHT11 Module x1
Jumper Wire Several
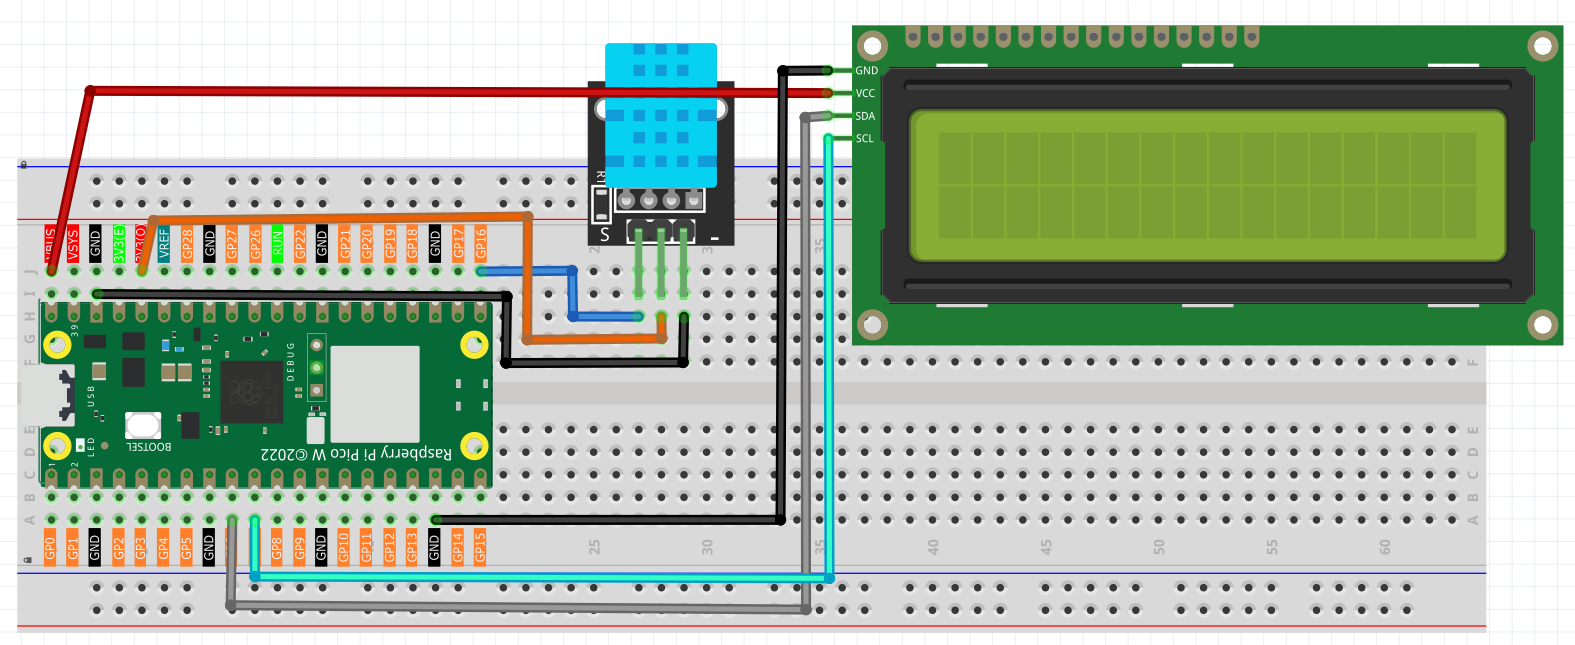
Connect
Code
Note
Open the
6.2_electronic_thermometer.pyfile under the path ofUltimate-Starter-Kit-for-Pico-W\1.Projector copy this code into Thonny, then click “Run Current Script” or simply press F5 to run it.Don’t forget to click on the “MicroPython (Raspberry Pi Pico)” interpreter in the bottom right corner.
After running the code, watch your personal weather station come to life! Here’s what you’ll see:
🔄 What happens when you run it: 1. Initial startup: The system initializes the DHT11 sensor and LCD display 2. First reading: Within 2 seconds, you’ll see the current temperature and humidity appear on the LCD 3. Continuous updates: Every 2 seconds, the display refreshes with new readings 4. Smart formatting: Temperature shows in Celsius (°C) and humidity as a percentage (%)
📱 Your LCD will show something like:
`
Temp: 23.5C
Humi: 45.2%
`
🧪 Fun experiments to try: - Breathe on the sensor - watch humidity jump up instantly! - Hold an ice cube near it - see temperature drop - Move it to different rooms - compare temperature variations - Cover it with your hand - observe both temperature and humidity changes
💡 Troubleshooting: If you see “Sensor Error” on the display, don’t worry! The system will automatically retry reading the sensor. This sometimes happens with DHT11 sensors and usually resolves within a few seconds.
The following is the program code:
from lcd1602 import LCD
from machine import I2C, Pin
import utime as time
from dht import DHT11, InvalidPulseCount

# Initialize DHT11 and LCD
sensor = DHT11(Pin(16, Pin.IN, Pin.PULL_UP))  # Connect DHT11 to GPIO16
i2c = I2C(1, sda=Pin(6), scl=Pin(7), freq=400000)
lcd = LCD(i2c)

def read_sensor():
    """Read data from the DHT11 sensor"""
    try:
        sensor.measure()
        temp = sensor.temperature
        hum = sensor.humidity
        return temp, hum
    except InvalidPulseCount:
        print('Invalid pulse count - retrying...')
        return None, None
    except Exception as e:
        print('Error reading sensor:', e)
        return None, None

# Main loop
while True:
    temp, hum = read_sensor()
    if temp is not None and hum is not None:
        # Display temperature and humidity
        string = "Temp: {:.1f}C\nHumi: {:.1f}%".format(temp, hum)
        lcd.message(string)
    else:
        lcd.message("Sensor Error\nPlease wait...")

    time.sleep(2)  # DHT11 recommends a sampling interval of at least 2 seconds
    lcd.clear()