6.7 Digital Spirit Level
Build your own high-tech digital spirit level that’s more sensitive and accurate than traditional bubble levels! This isn’t just any level - it’s a motion-sensing, LED-powered precision instrument that responds instantly to the tiniest tilts.
🎯 What You’ll Create: A professional-grade digital level using a 10-LED bar display. Just like the spirit levels that carpenters, builders, and photographers use, but with digital precision and instant visual feedback!
⚖️ How Traditional vs Digital Levels Work: - Traditional bubble level: Uses a liquid bubble in a curved tube - Your digital level: Uses a motion sensor and LED indicators for precise tilt detection
✨ Why Digital is Better: - Instant response: No waiting for bubbles to settle - High precision: Detects even the smallest tilts - Clear indication: Bright LED shows exact tilt direction - No fragile parts: No glass tubes or liquid to break - Works in any light: LEDs visible even in bright conditions
🔧 Perfect For: Leveling picture frames, checking if tables are stable, calibrating 3D printers, or just impressing friends with your high-tech spirit level!
🎛️ How Your Digital Level Works:
📡 The Motion Sensor: The MPU6050 acts as your digital “bubble” - it measures gravity’s pull in all directions and calculates exactly how tilted your device is. No liquid needed!
💡 The LED Indicator System: Instead of a traditional LED matrix, this version uses a 10-LED bar (like a volume meter) where: - Middle LED (LED 5) = Perfectly level! 🎯 - LEDs 1-4 = Tilted left (more tilt = lower number) - LEDs 6-10 = Tilted right (more tilt = higher number)
🧠 Smart Calibration: The system maps tilt angles from -30° to +30° across all 10 LEDs, giving you precise tilt measurement with instant visual feedback!
Component List
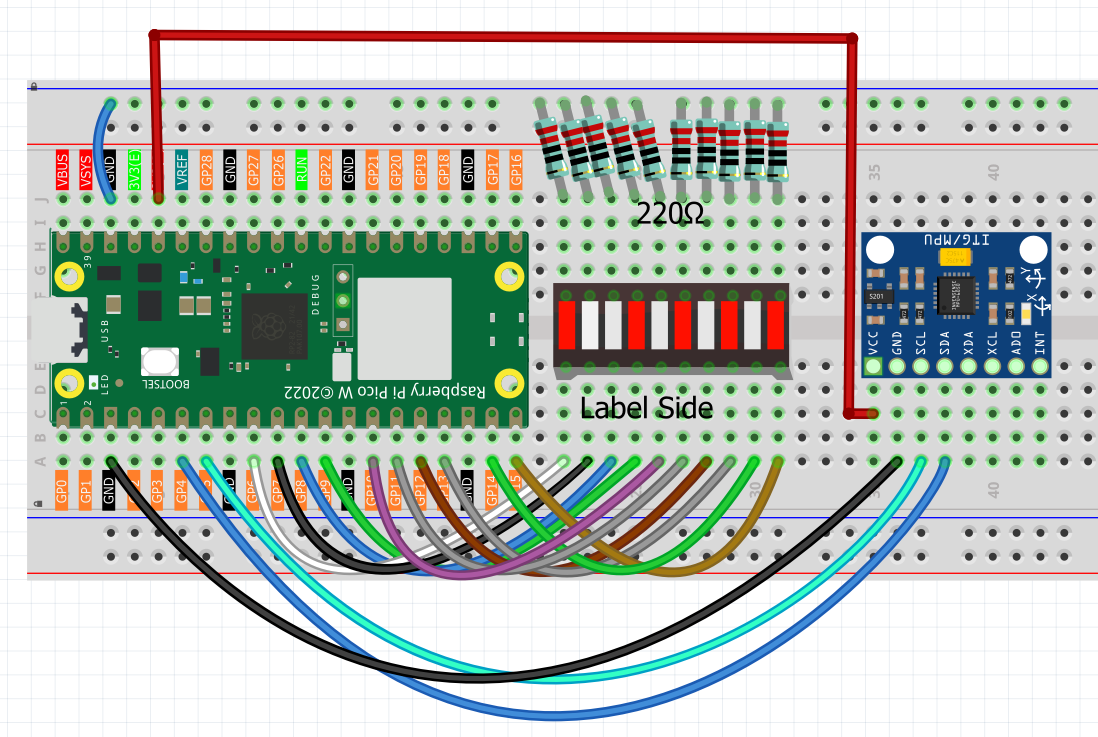
Raspberry Pi Pico W x1
MicroUSB cable x1
830 Tie-Points Breadboard x1
MPU6050 Module x1
LED Bar x1
Jumper Wire Several
Note: This project uses individual LEDs in a bar formation, not a dot matrix, making it easier to build and understand!
Connect
Code
Note
Open the
6.7_digital_level.pyfile under the path ofUltimate-Starter-Kit-for-Pico-W\Python\1.Projector copy this code into Thonny, then click “Run Current Script” or simply press F5 to run it.Don’t forget to click on the “MicroPython (Raspberry Pi Pico)” interpreter in the bottom right corner.
After running the code, prepare to test your professional digital spirit level!
🎯 Getting Started: 1. Place on level surface: Put your breadboard on a flat, level surface 2. Check calibration: The middle LED (LED 5) should light up if perfectly level 3. Start testing: Tilt the breadboard and watch the LED indicator move!
📊 How to Read Your Digital Level: - LED 5 (center): Perfect! Your surface is level ✅ - LEDs 1-4: Tilted left - the lower the number, the more the tilt - LEDs 6-10: Tilted right - the higher the number, the more the tilt - LED response: Instant! No waiting for bubbles to settle
🧪 Fun Experiments to Try: - Test your table: Is your desk actually level? - Check picture frames: Make sure they’re hanging straight - Smartphone comparison: Compare with your phone’s built-in level app - Sensitivity test: See how small a tilt you can detect (it’s very sensitive!) - Different surfaces: Test various surfaces around your house
💡 Pro Tips: - The system is calibrated for ±30° range - perfect for most leveling tasks - If no LED lights up, try gently moving the sensor until one appears - The LED changes instantly as you tilt - much faster than traditional levels!
You now have a precision digital instrument that rivals professional tools! 🎉
The following is the program code:
# 6.7_led_bar_level.py
# Description: A digital spirit level using an MPU6050 sensor and a 10-segment LED bar graph.
# The lit LED on the bar indicates the angle of tilt.

import machine
from machine import I2C, Pin
import time
import math
from imu import MPU6050

# --- Hardware Configuration ---

# 1. MPU6050 (GY-521) Sensor Setup
i2c = I2C(0, sda=Pin(4), scl=Pin(5), freq=400000)
mpu = MPU6050(i2c)
print("MPU6050 sensor initialized.")

# 2. LED Bar Setup (using pins from the chaser light project)
LED_PINS = [6, 7, 8, 9, 10, 11, 12, 13, 14, 15]
NUM_LEDS = len(LED_PINS)
leds = []

# --- Helper Functions ---

def initialize_leds():
    """Initialize all LED pins as outputs and store them."""
    global leds
    for pin_id in LED_PINS:
        led = machine.Pin(pin_id, machine.Pin.OUT)
        led.value(0)  # Ensure all LEDs are off initially
        leds.append(led)
    print(f"Initialized {NUM_LEDS}-segment LED bar.")

def dist(a, b):
    """Calculates the distance between two points, used for angle calculation."""
    return math.sqrt((a * a) + (b * b))

def get_x_rotation(x, y, z):
    """Calculates the rotation angle around the X-axis from accelerometer data."""
    radians = math.atan2(y, dist(x, z))
    return math.degrees(radians)

def map_value(x, in_min, in_max, out_min, out_max):
    """Maps a value from one numerical range to another."""
    # Clamp the input value to the specified range
    x = max(in_min, min(x, in_max))
    return (x - in_min) * (out_max - out_min) / (in_max - in_min) + out_min

# --- Core Logic ---

def update_led_bar_display(angle):
    """Updates the LED bar to reflect the current tilt angle."""

    # Define the sensitivity range. A smaller angle range makes the level more sensitive.
    # e.g., -30 to +30 degrees of tilt will cover the full LED bar.
    SENSITIVITY_RANGE = 30.0

    # Map the angle (-SENSITIVITY_RANGE to +SENSITIVITY_RANGE) to an LED index (0 to 9)
    led_index = map_value(angle, -SENSITIVITY_RANGE, SENSITIVITY_RANGE, 0, NUM_LEDS - 1)
    led_index = int(round(led_index))

    # Turn all LEDs off, then turn the correct one on.
    for i in range(NUM_LEDS):
        if i == led_index:
            leds[i].value(1)  # Turn on the target LED
        else:
            leds[i].value(0)  # Turn off all other LEDs

# --- Main Program ---

def main():
    """Main function to run the digital level."""

    initialize_leds()

    print("\nDigital Level is active. Tilt the sensor.")
    print("The middle LED indicates a level surface.")

    try:
        while True:
            # Read accelerometer data from the sensor
            accel_data = mpu.accel

            # Calculate the tilt angle
            x_angle = get_x_rotation(accel_data.x, accel_data.y, accel_data.z)

            # Update the LED display based on the angle
            update_led_bar_display(x_angle)

            # Optional: print the angle for debugging
            # print(f"Angle: {x_angle:.2f} degrees")

            # A short delay to keep the updates smooth
            time.sleep(0.05)

    except KeyboardInterrupt:
        print("\nProgram stopped by user.")
    finally:
        # Ensure all LEDs are turned off on exit
        for led in leds:
            led.value(0)
        print("All LEDs turned off. Goodbye!")

# Run the main program
if __name__ == "__main__":
    main()