7.7 Professional Blynk IoT Platform
📱 Build Your Own Mobile IoT Dashboard!
Create a professional mobile application to control and monitor your IoT devices using Blynk, the world’s most popular IoT platform. This project transforms your smartphone into a powerful IoT control center with real-time monitoring and remote device control capabilities.
✨ What You’re Building: - Professional Mobile App: Custom iOS/Android app for your IoT project - Real-time Monitoring: Live temperature and humidity readings on your phone - Remote RGB Control: Precise brightness control with smooth sliders - Cloud Integration: Global access to your device from anywhere - Professional Dashboard: Beautiful, customizable mobile interface - Zero Coding Mobile App: No mobile development skills required
🔗 Circuit Compatibility: This project uses the same circuit as Chapter 7.4, making it easy to switch between web browser control and mobile app control for the same hardware.
🎯 Why Blynk vs. Web Server? - Native Mobile Experience: Optimized for smartphones and tablets - Global Access: Control from anywhere with internet connection - Push Notifications: Get alerts and notifications on your phone - Widget Library: Professional UI components (sliders, graphs, buttons) - Cloud Storage: Historical data storage and analysis - Multi-device Support: Control multiple IoT devices from one app
Component List
Raspberry Pi Pico W x1
MicroUSB cable x1
830 Tie-Points Breadboard x1
DHT11 Module x1
Resistor 220Ω x3
RGB-LED x1
Li-po Charger Module x1
Battery Holder x1
Jumper Wire Several
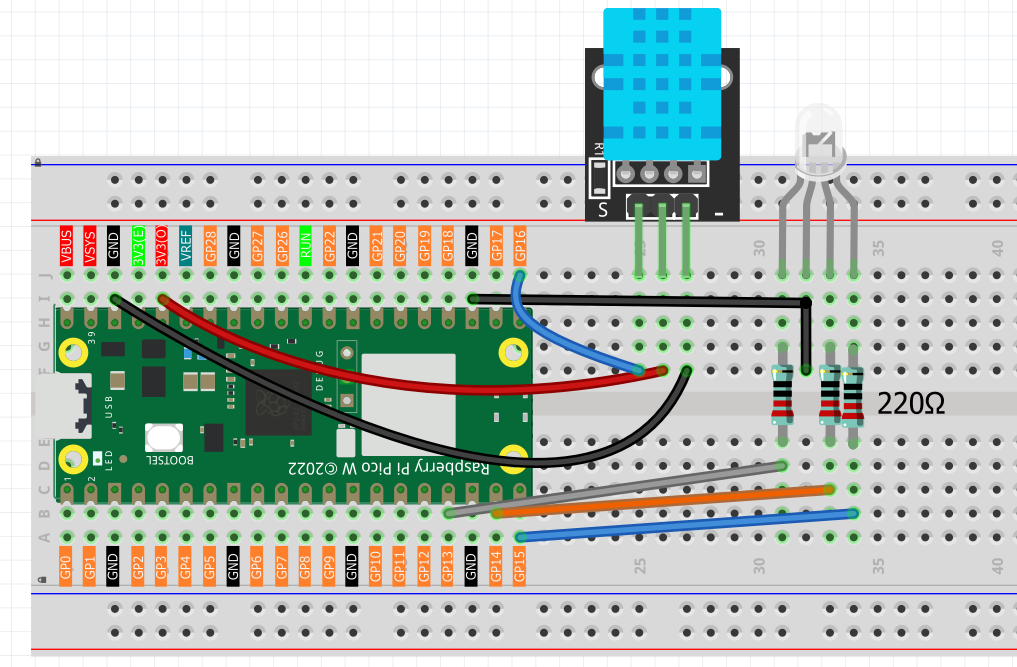
Connect
Warning
Make sure your Li-po Charger Module is connected as shown in the diagram. Otherwise, a short circuit will likely damage your battery and circuitry.
🛠️ Setting Up Blynk Cloud Platform
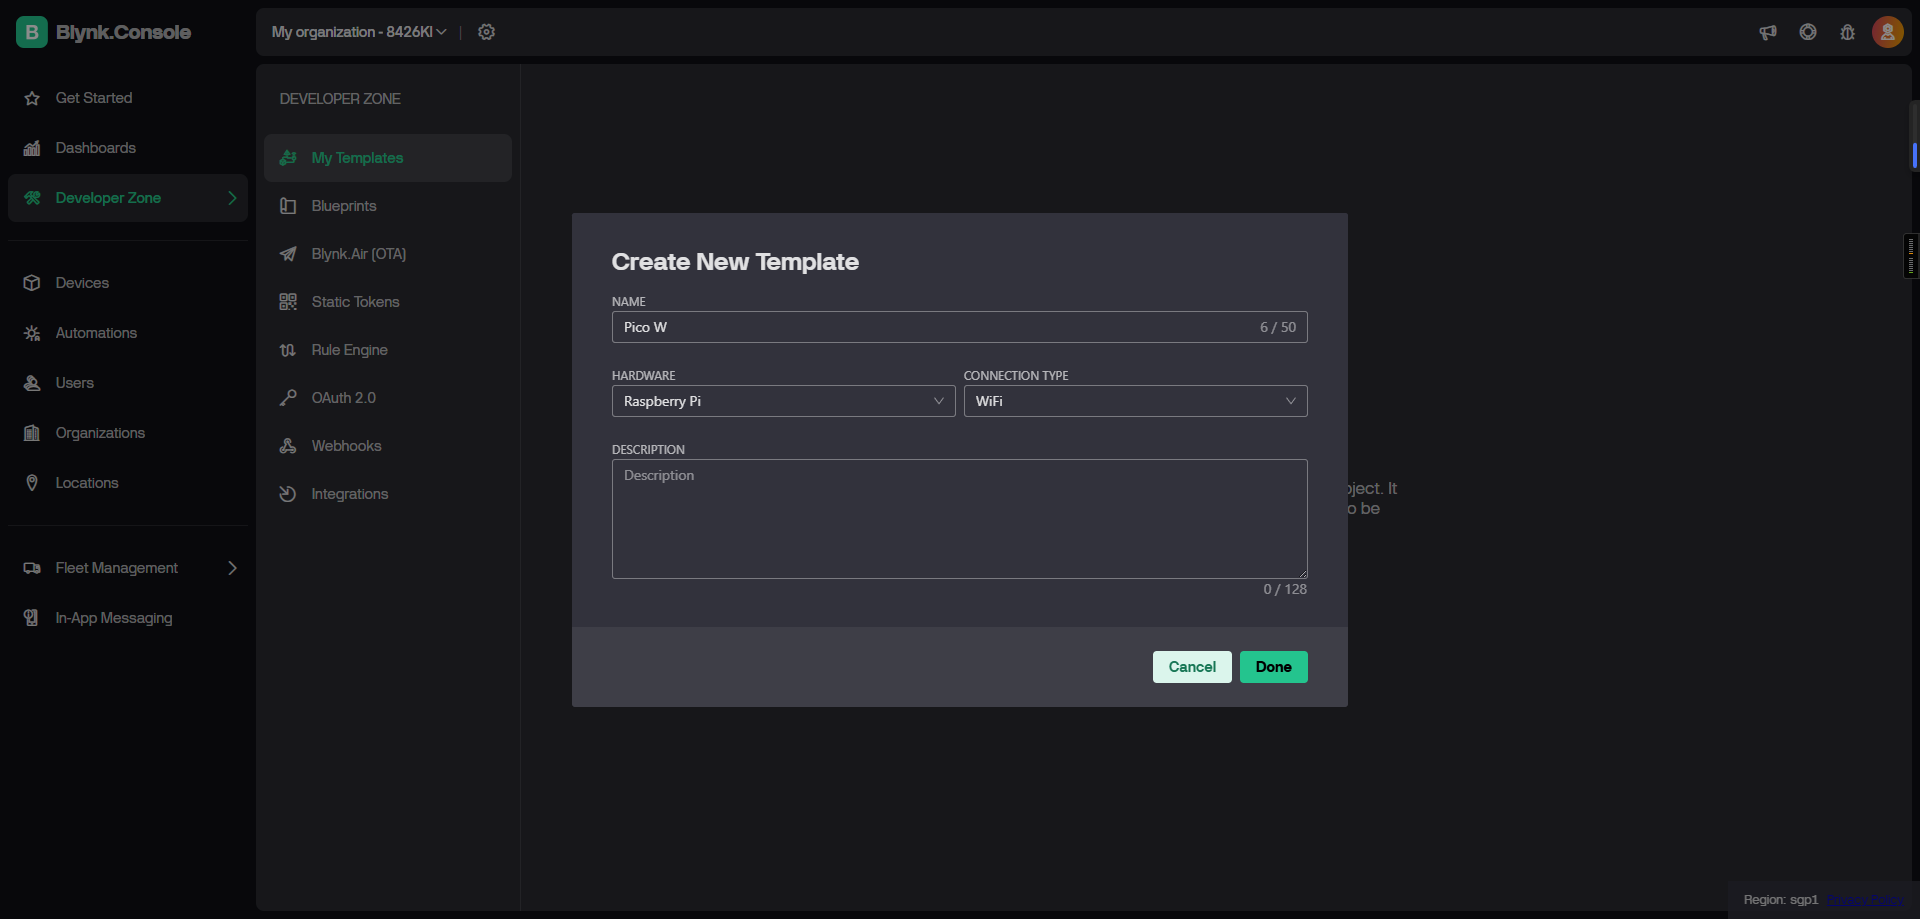
Step 1: Create Blynk Account and Template
Register and Login to Blynk Cloud
Create a New Template for your IoT device
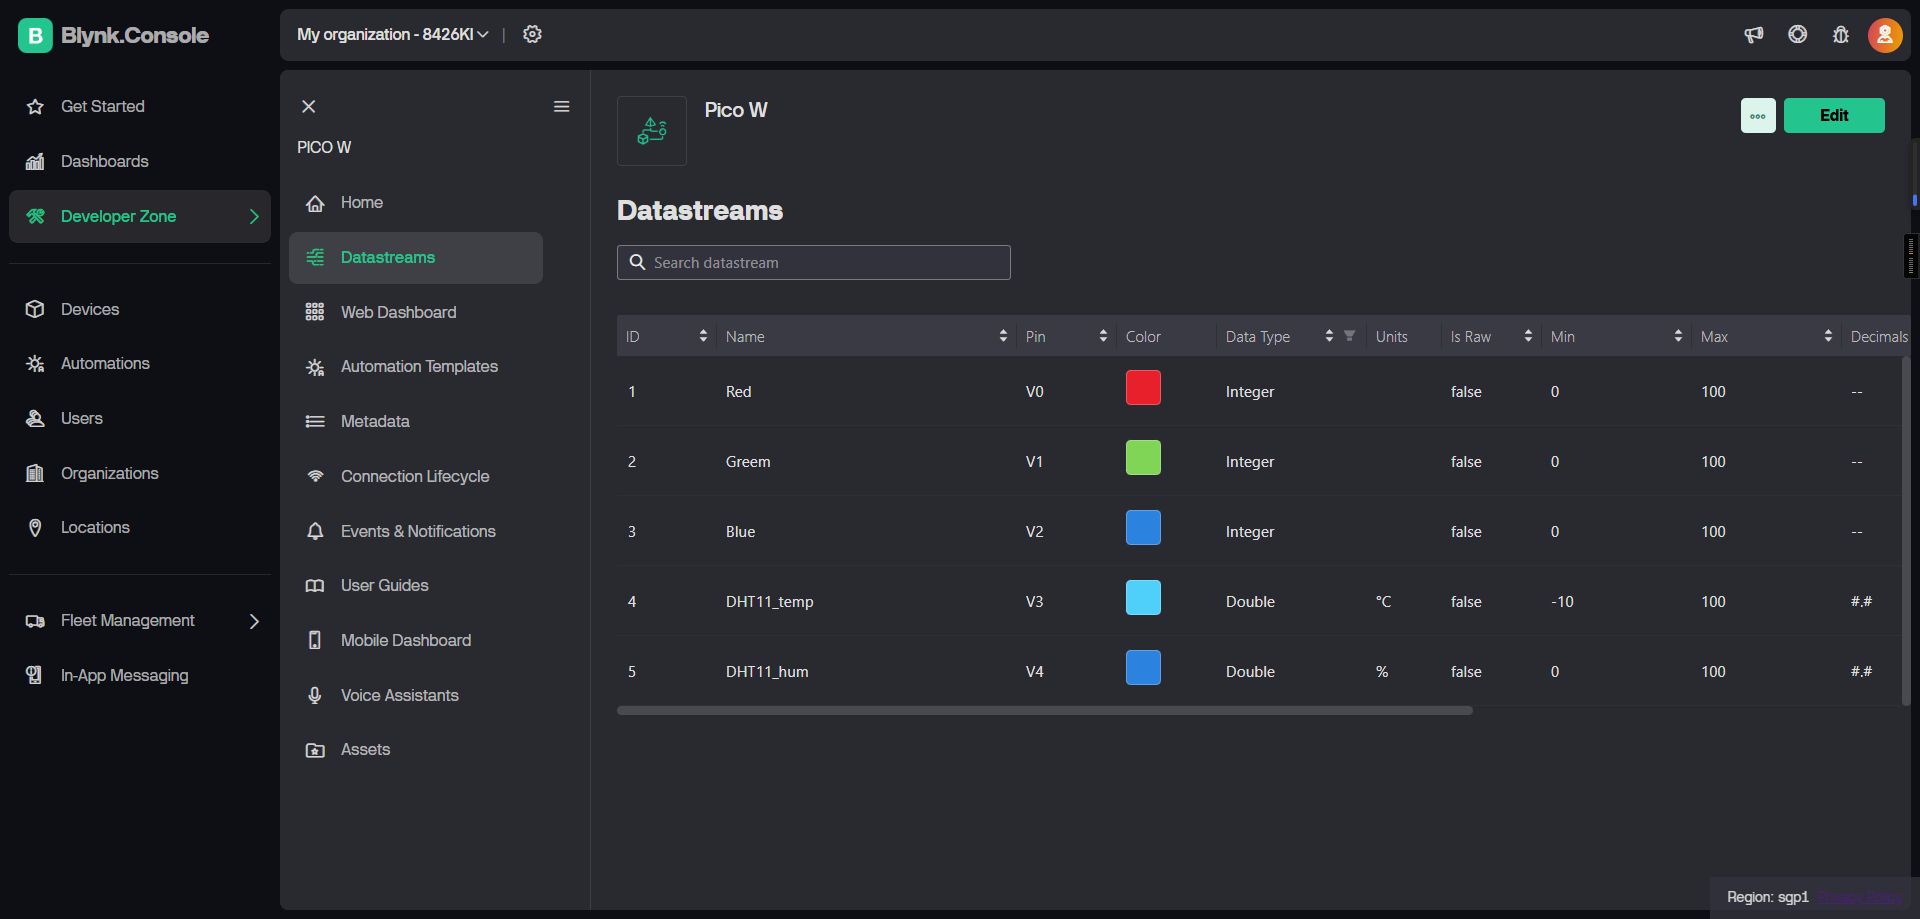
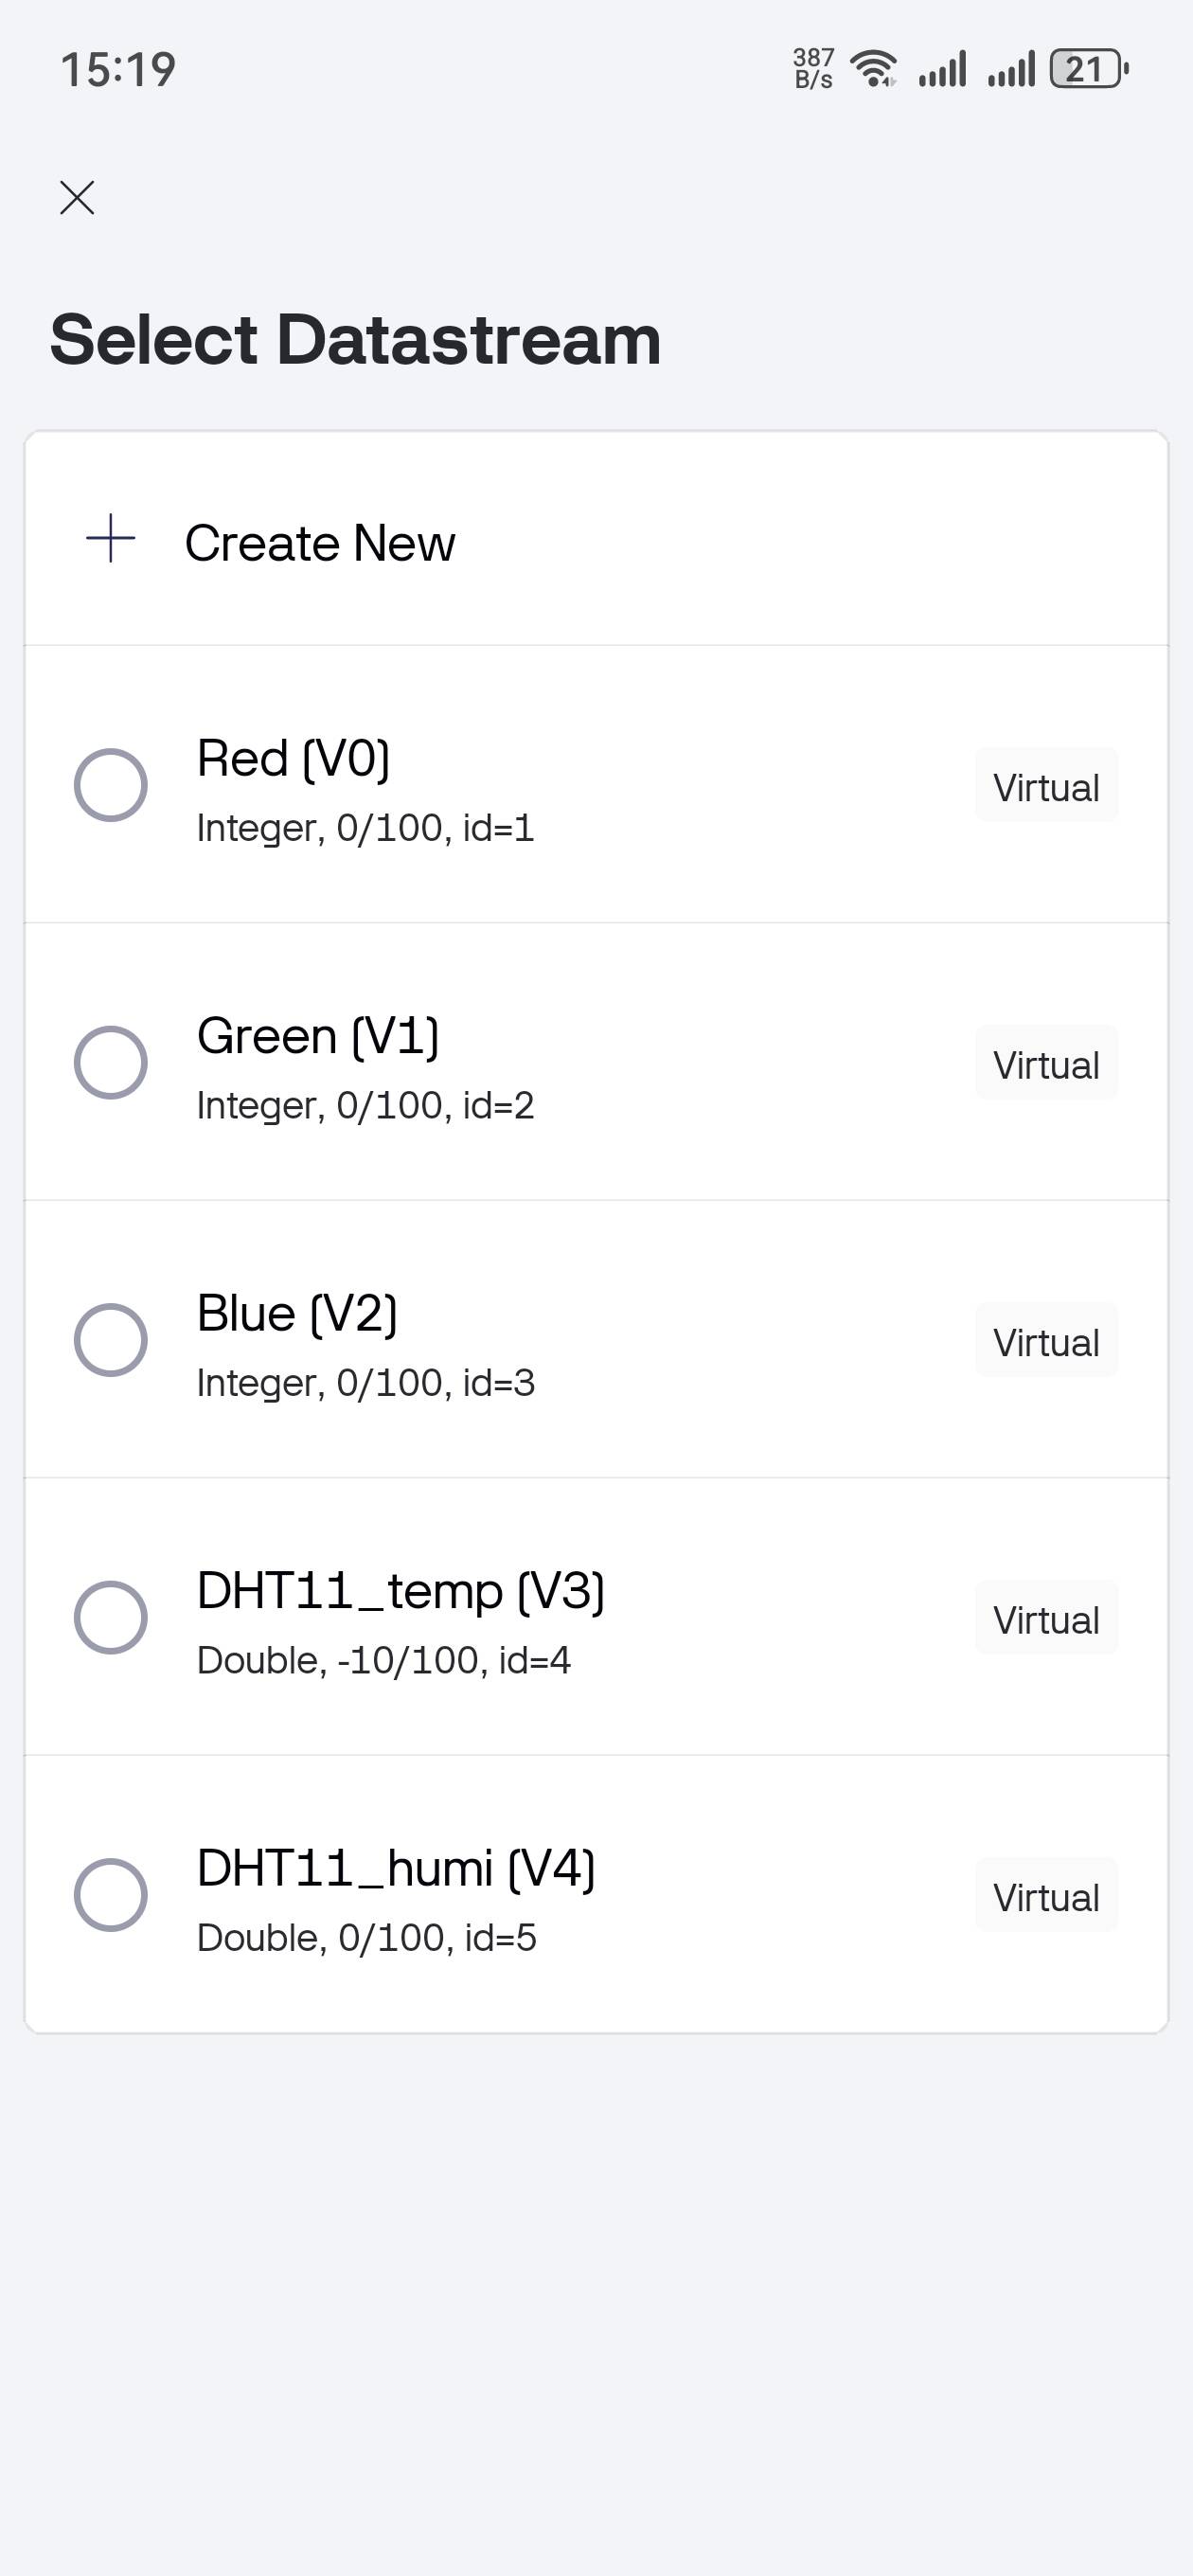
Step 2: Configure Data Streams (Virtual Pins)
Set up 5 virtual pins for complete device control and monitoring:
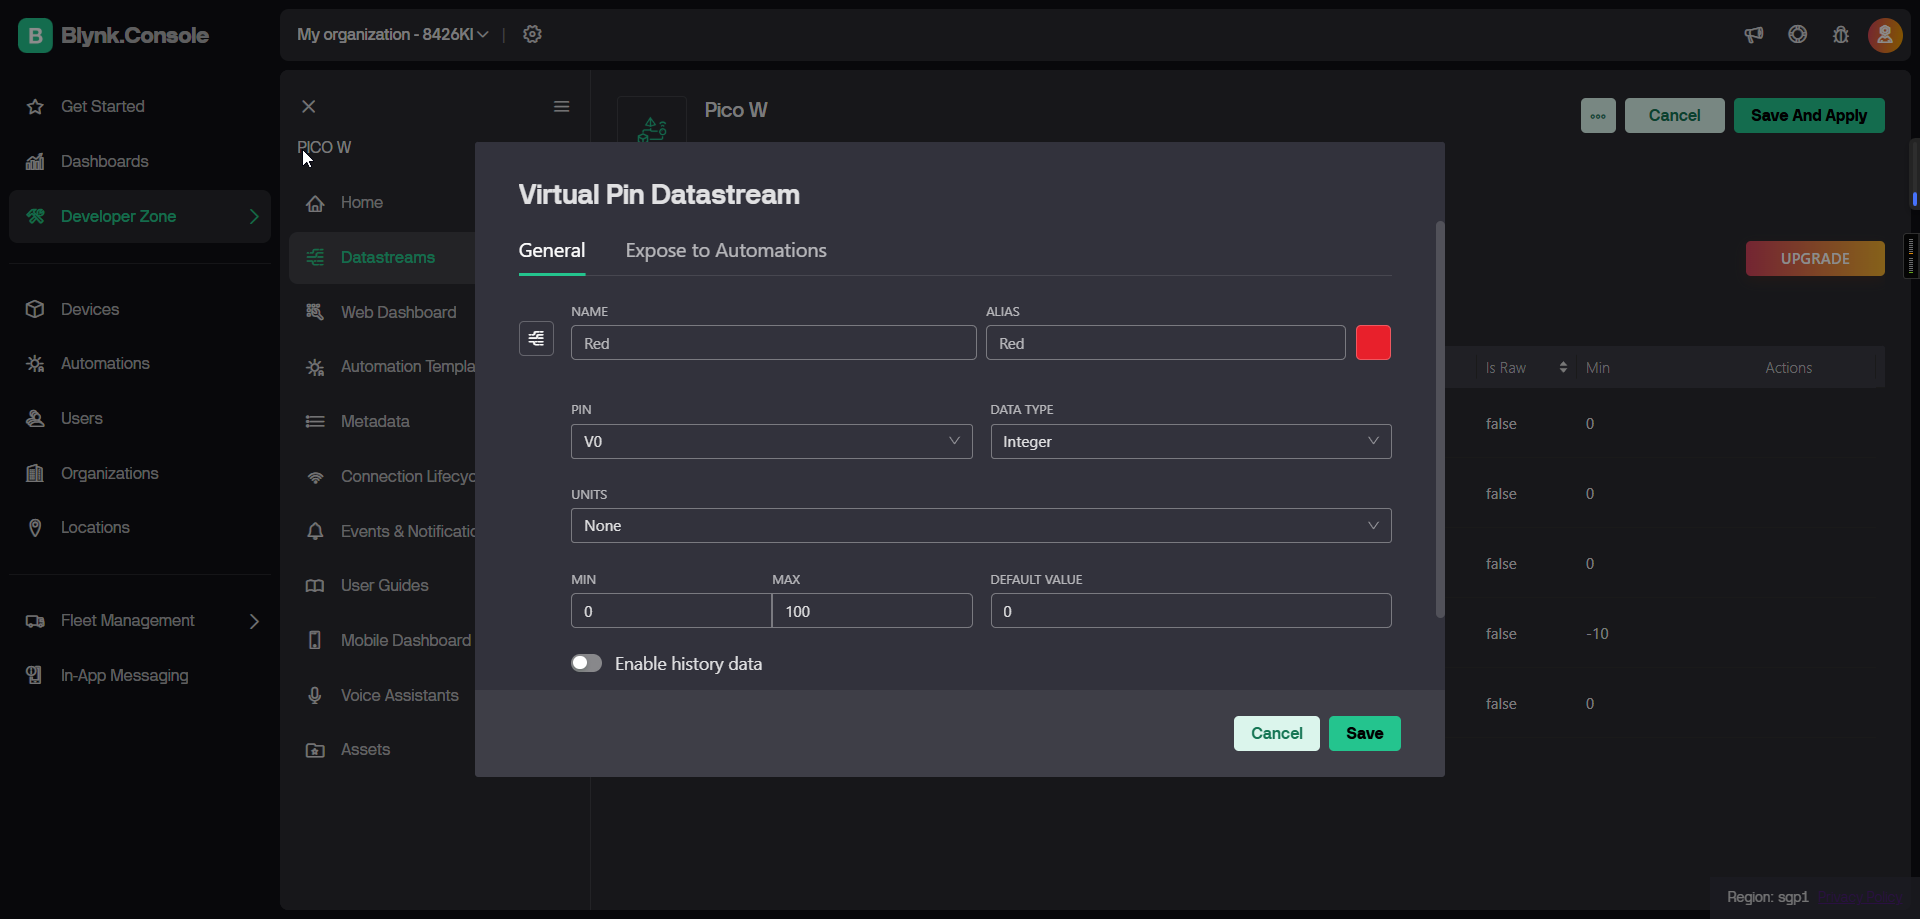
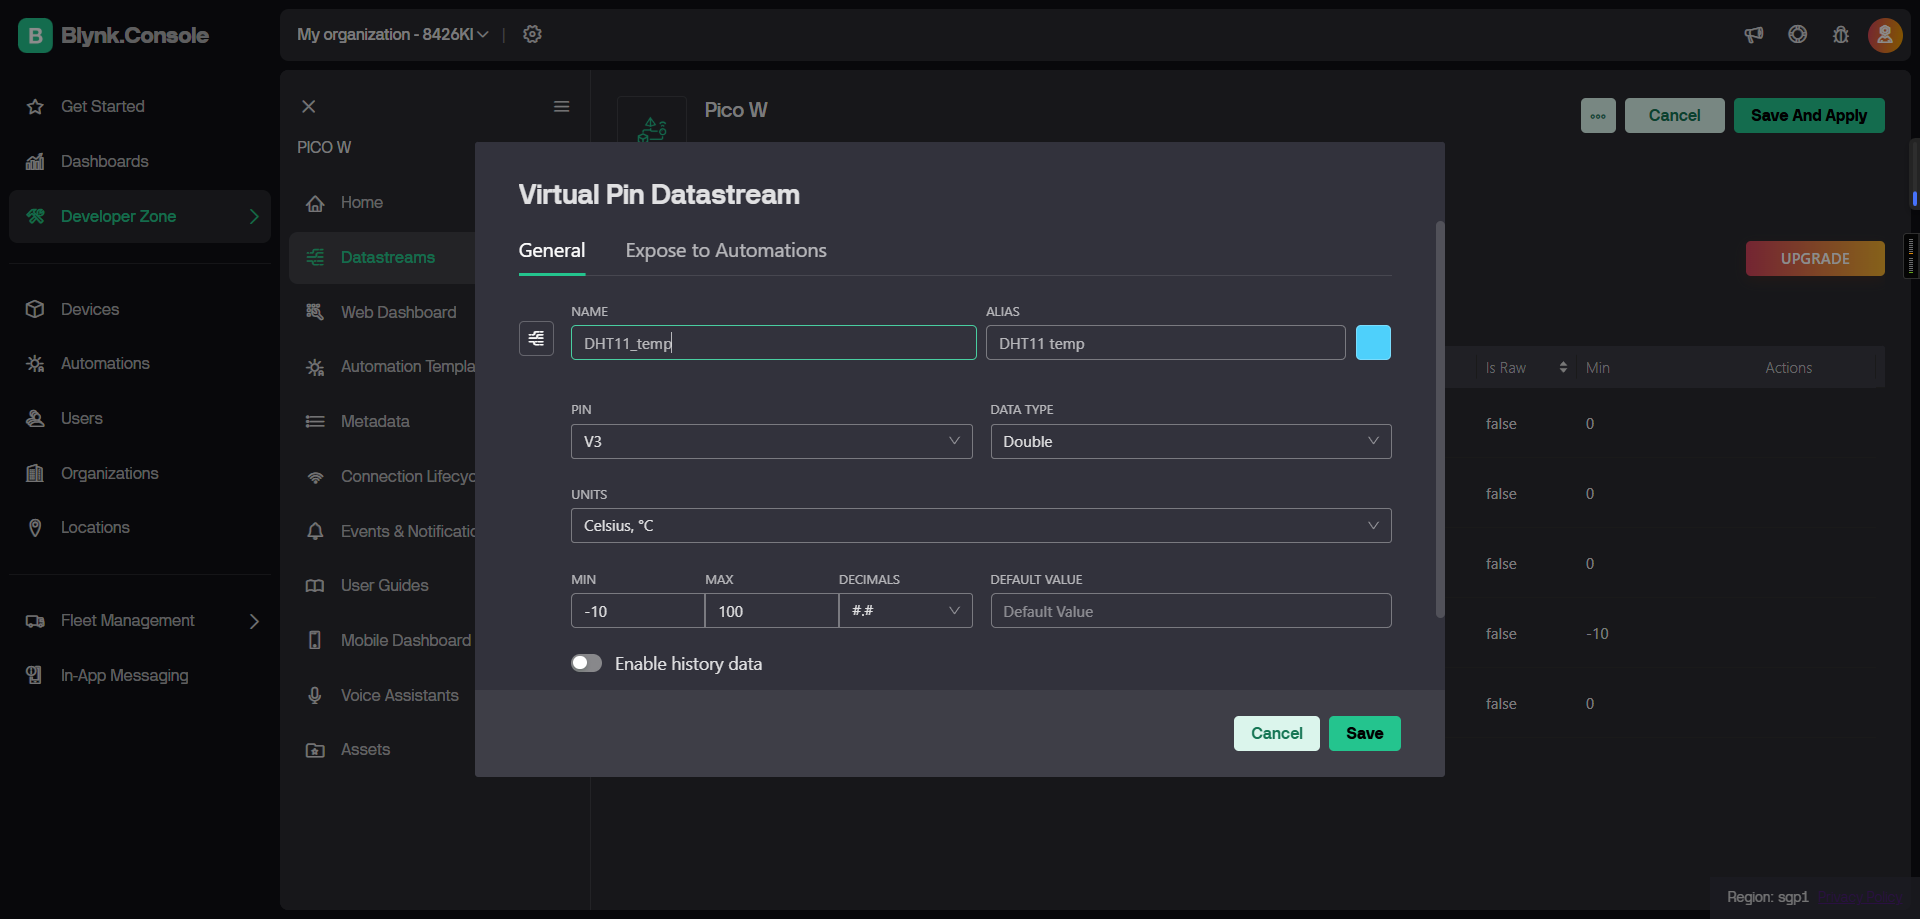
Virtual Pin Configuration: - V0: Red LED Brightness (Integer, 0-100) - V1: Green LED Brightness (Integer, 0-100) - V2: Blue LED Brightness (Integer, 0-100) - V3: Temperature Display (Double, Read Only) - V4: Humidity Display (Double, Read Only)
Your completed datastreams should look like this:
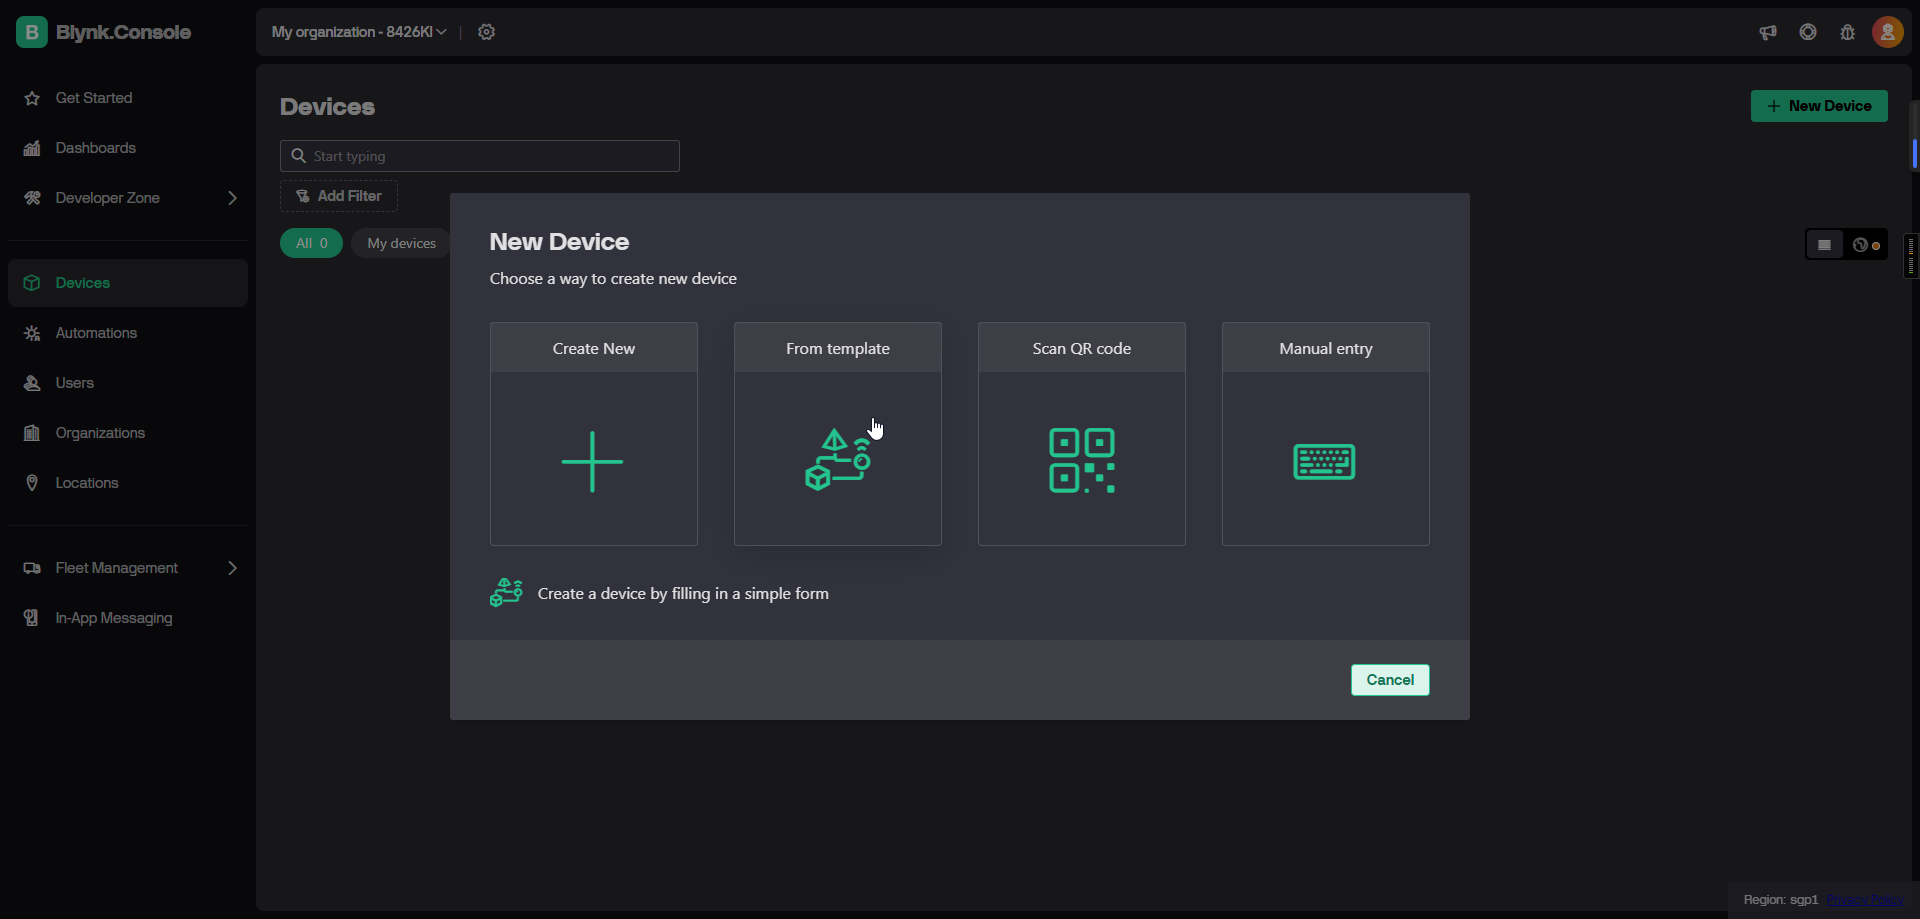
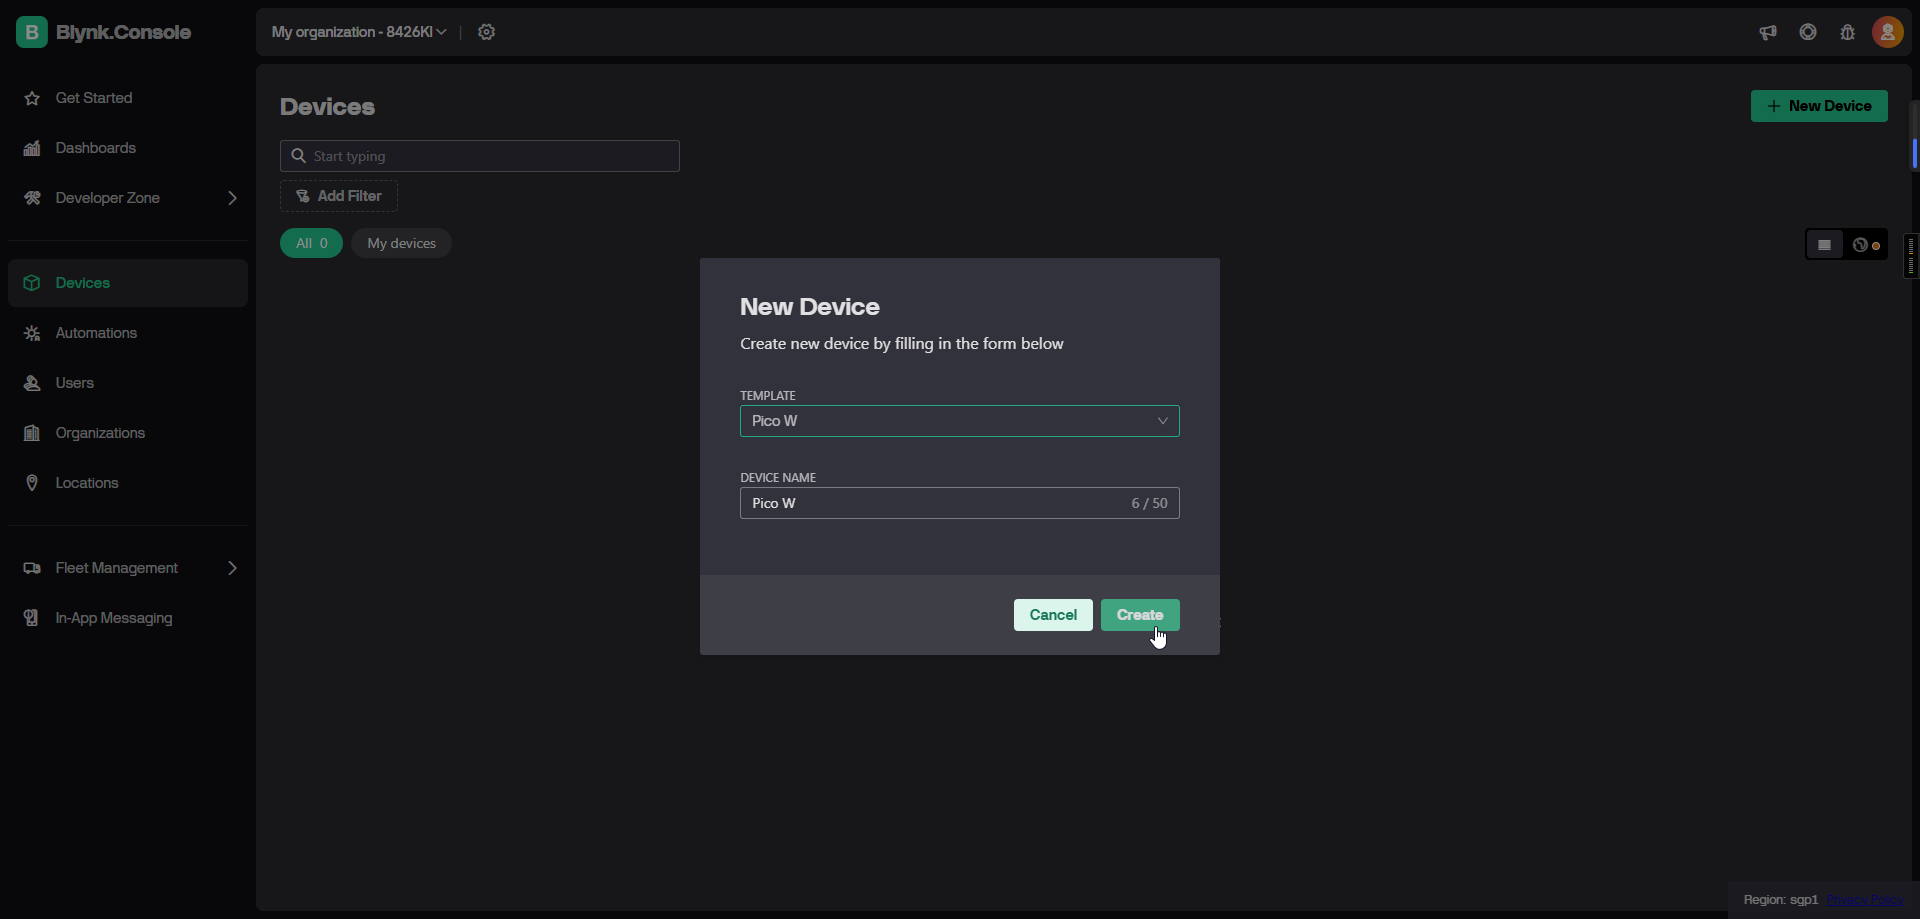
Step 3: Create Device from Template
Create a new device from your template - this automatically imports all datastream settings
Name your device “Pico W” for easy identification
Step 4: Get Your Authentication Token
Click on your device, then select “Developer Tools”
Copy the BLYNK_AUTH_TOKEN from the Firmware Configuration section
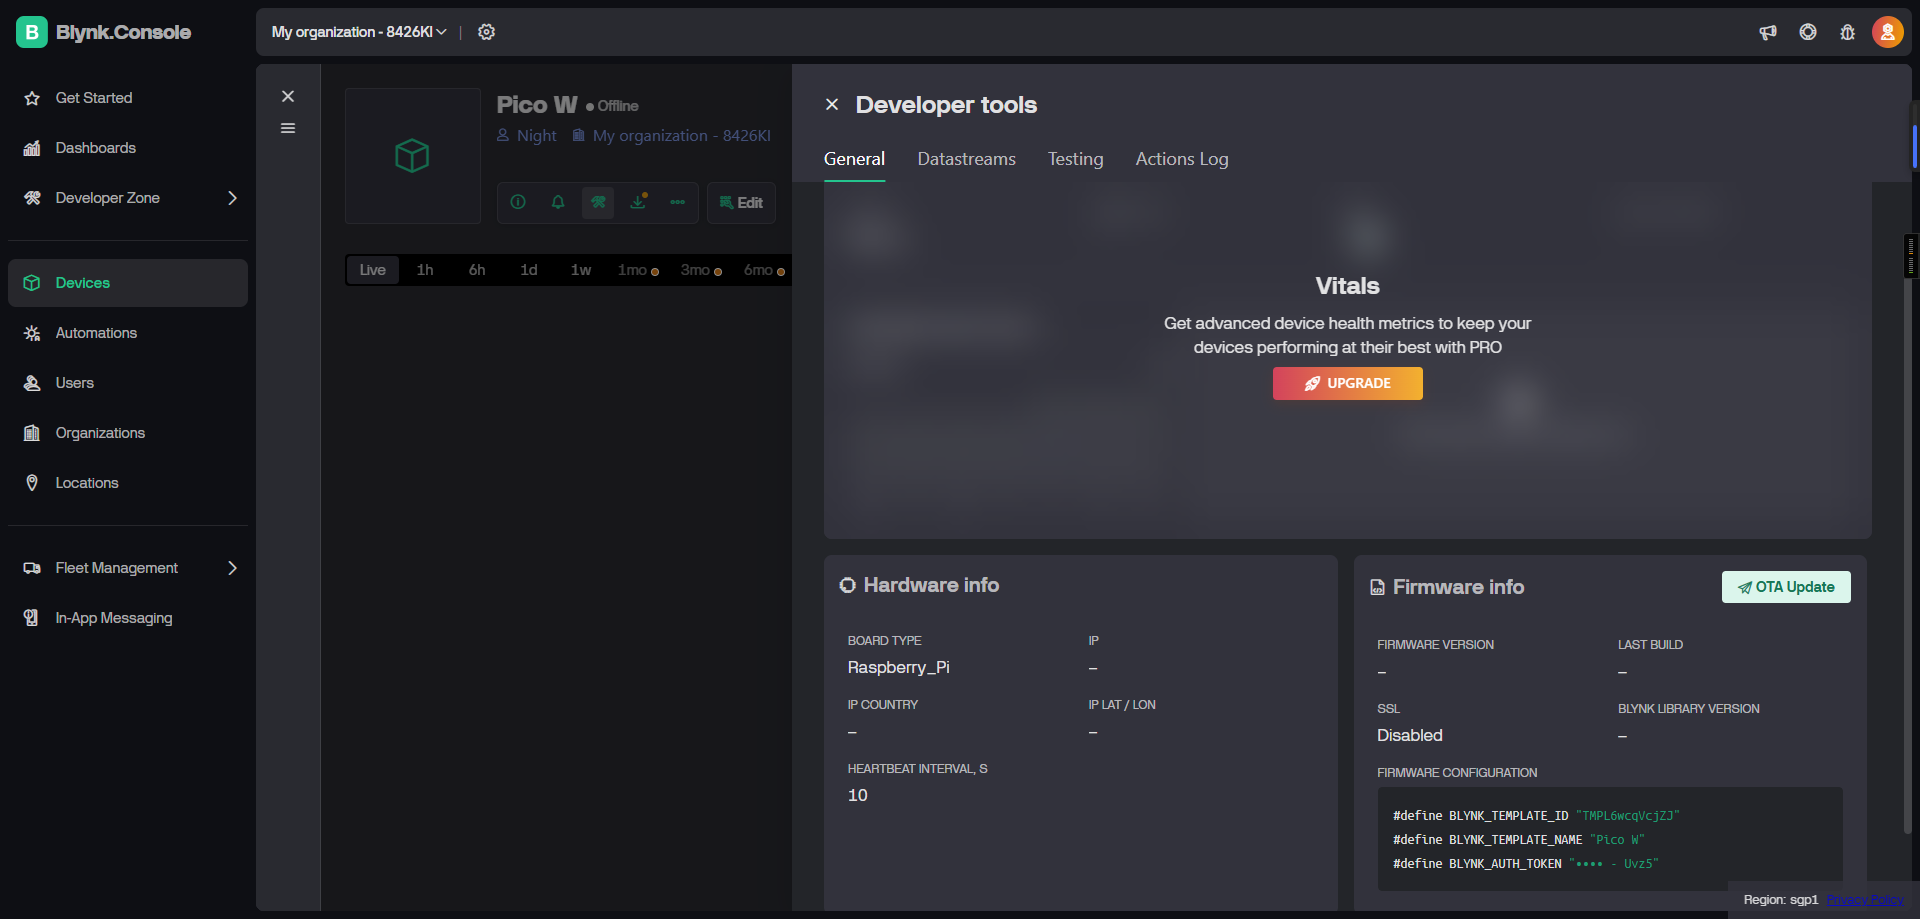
Paste this token into line 136 of your MicroPython code (replace “YOUR_BLYNK_TOKEN_HERE”)
📱 Setting Up the Mobile App
Step 1: Download Blynk App
Download the official Blynk app: - iOS: Search “Blynk IoT” in App Store - Android: Search “Blynk IoT” in Google Play Store - Direct Link: https://blynk.io/no-code-iot-mobile-apps
Step 2: Login and Access Your Device
Login with your Blynk account credentials
You’ll see your “Pico W” device in the main dashboard
Tap on the device to enter the control interface
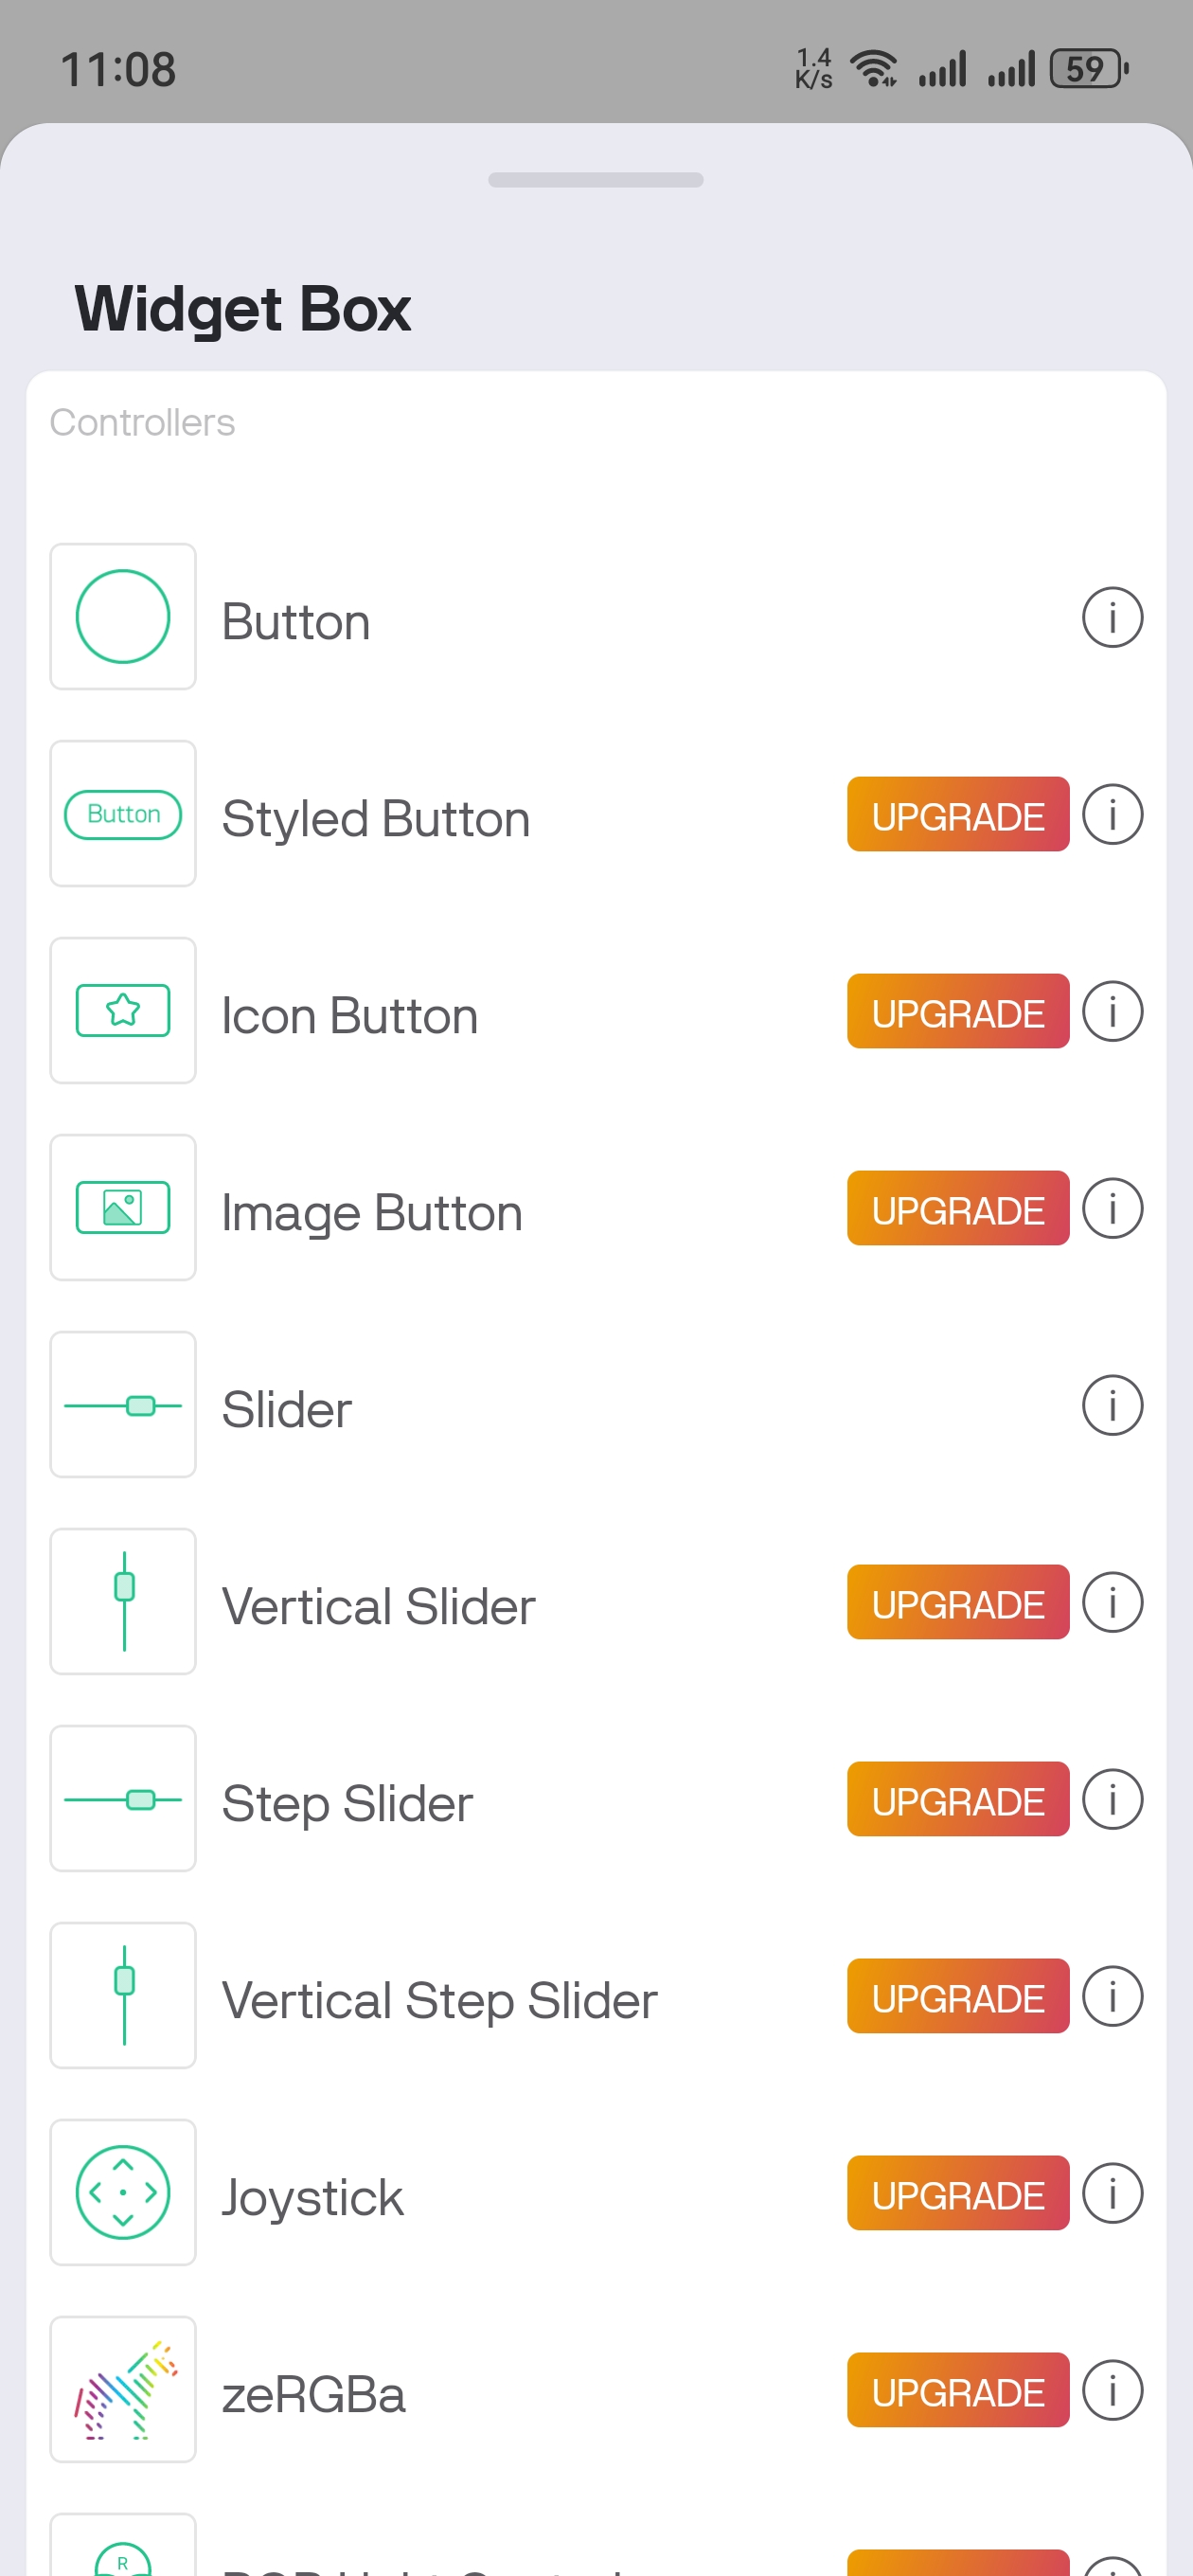
Step 3: Add Control Widgets
Tap the wrench icon (top-right corner) to enter edit mode
Tap the green plus (+) button to add widgets
Required Widgets: - 3x Slider Widgets (for RGB brightness control) - 2x Value Display Widgets (for temperature and humidity)

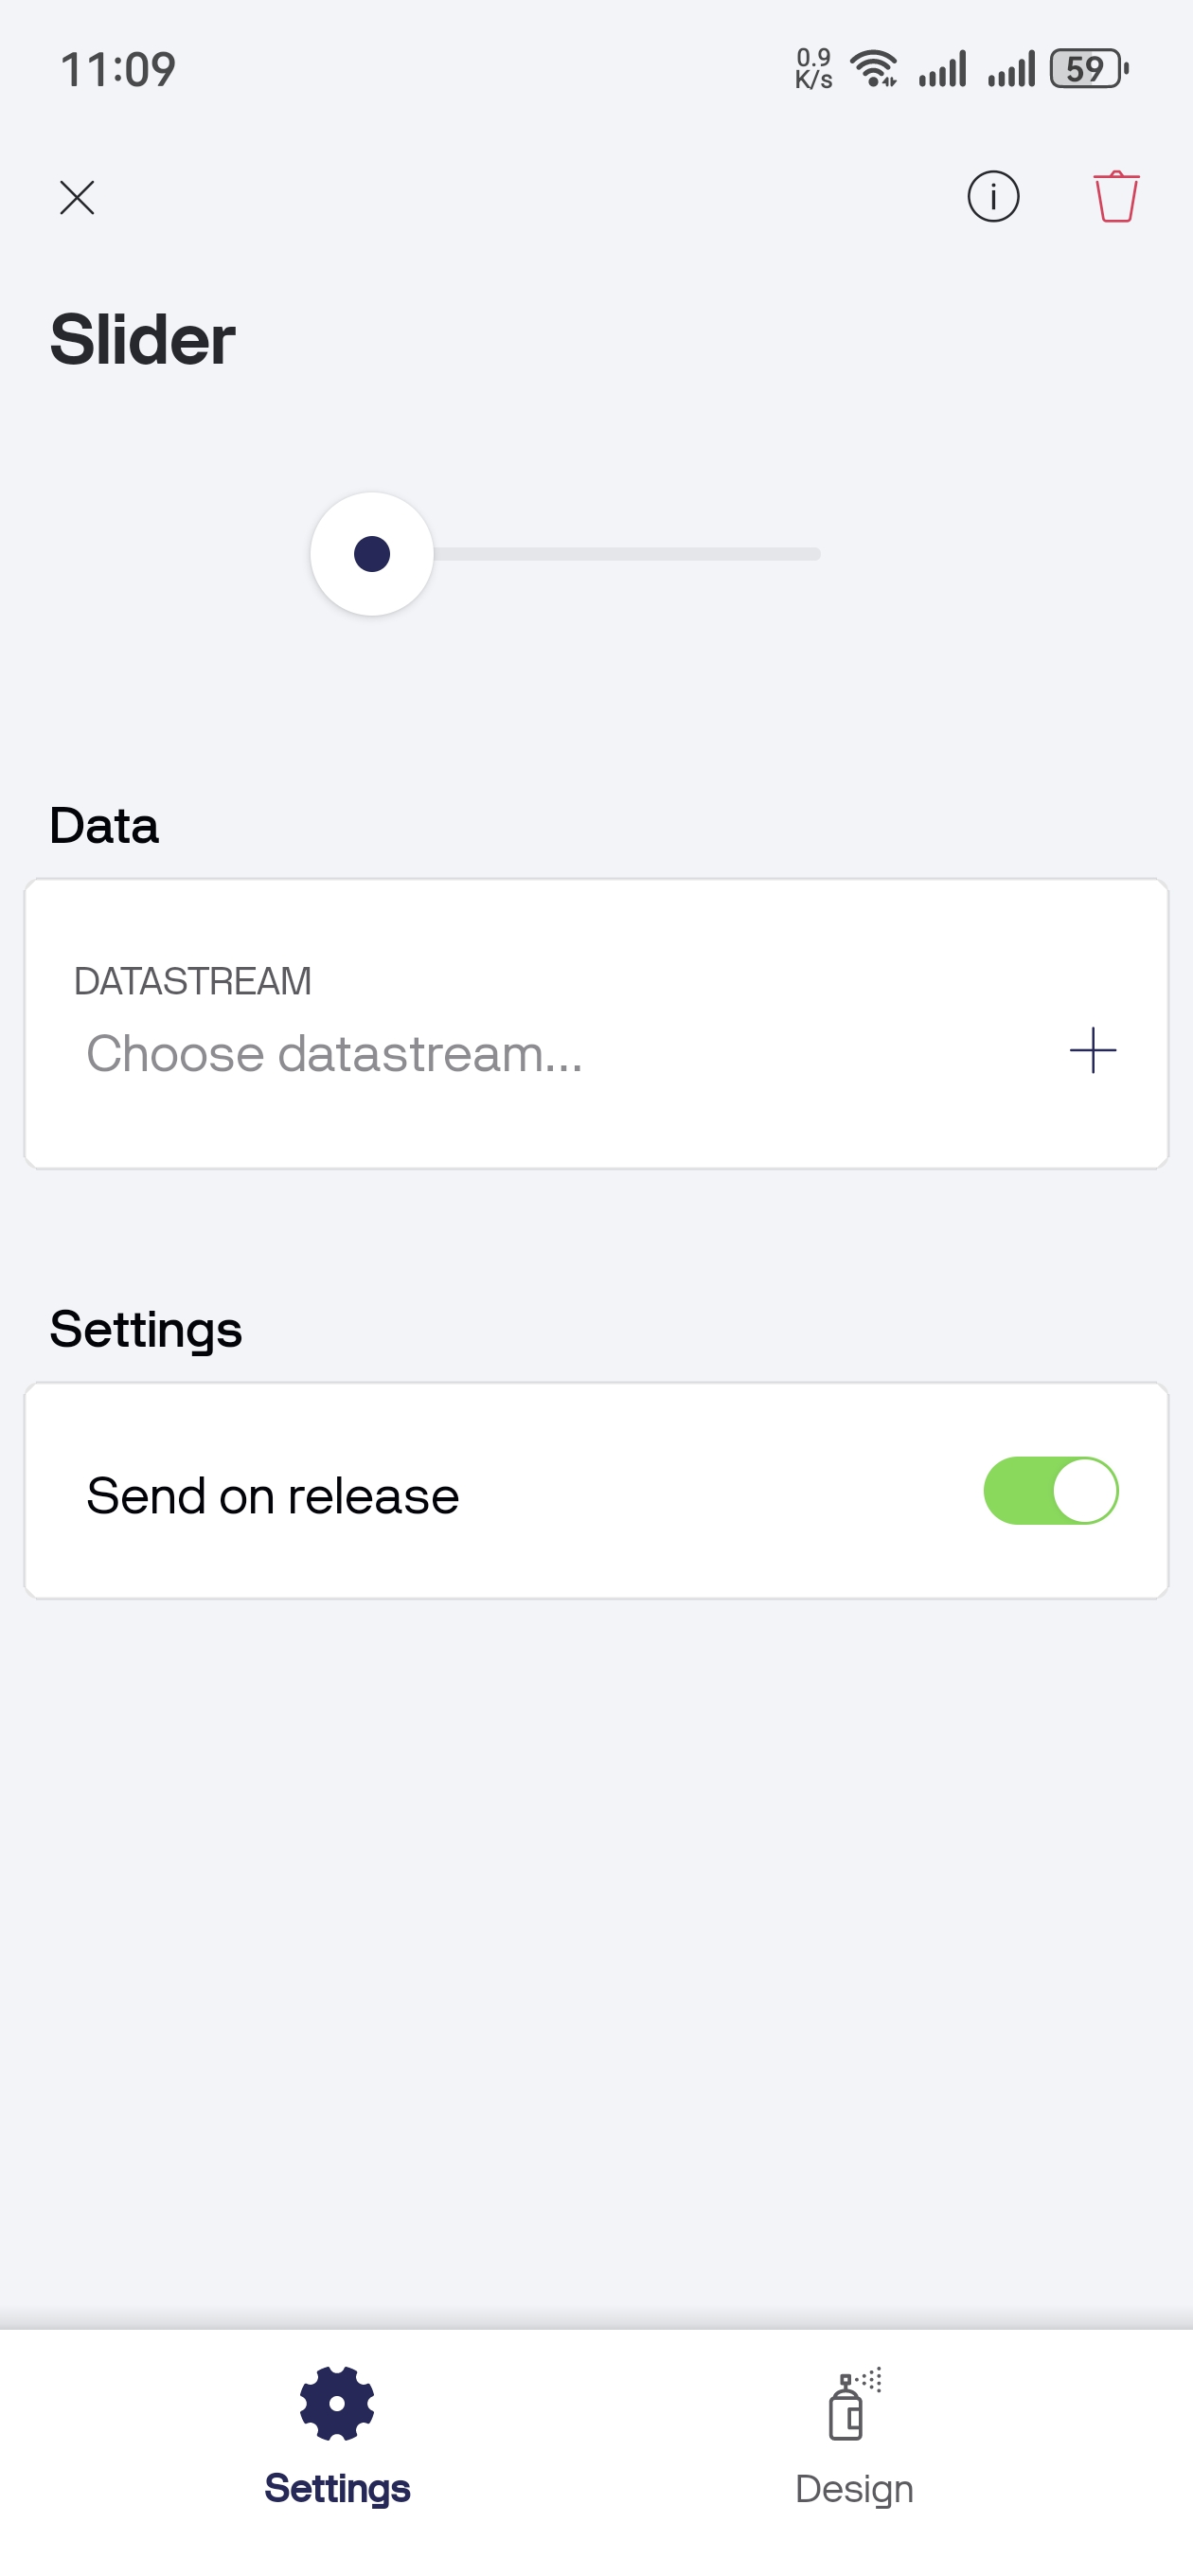
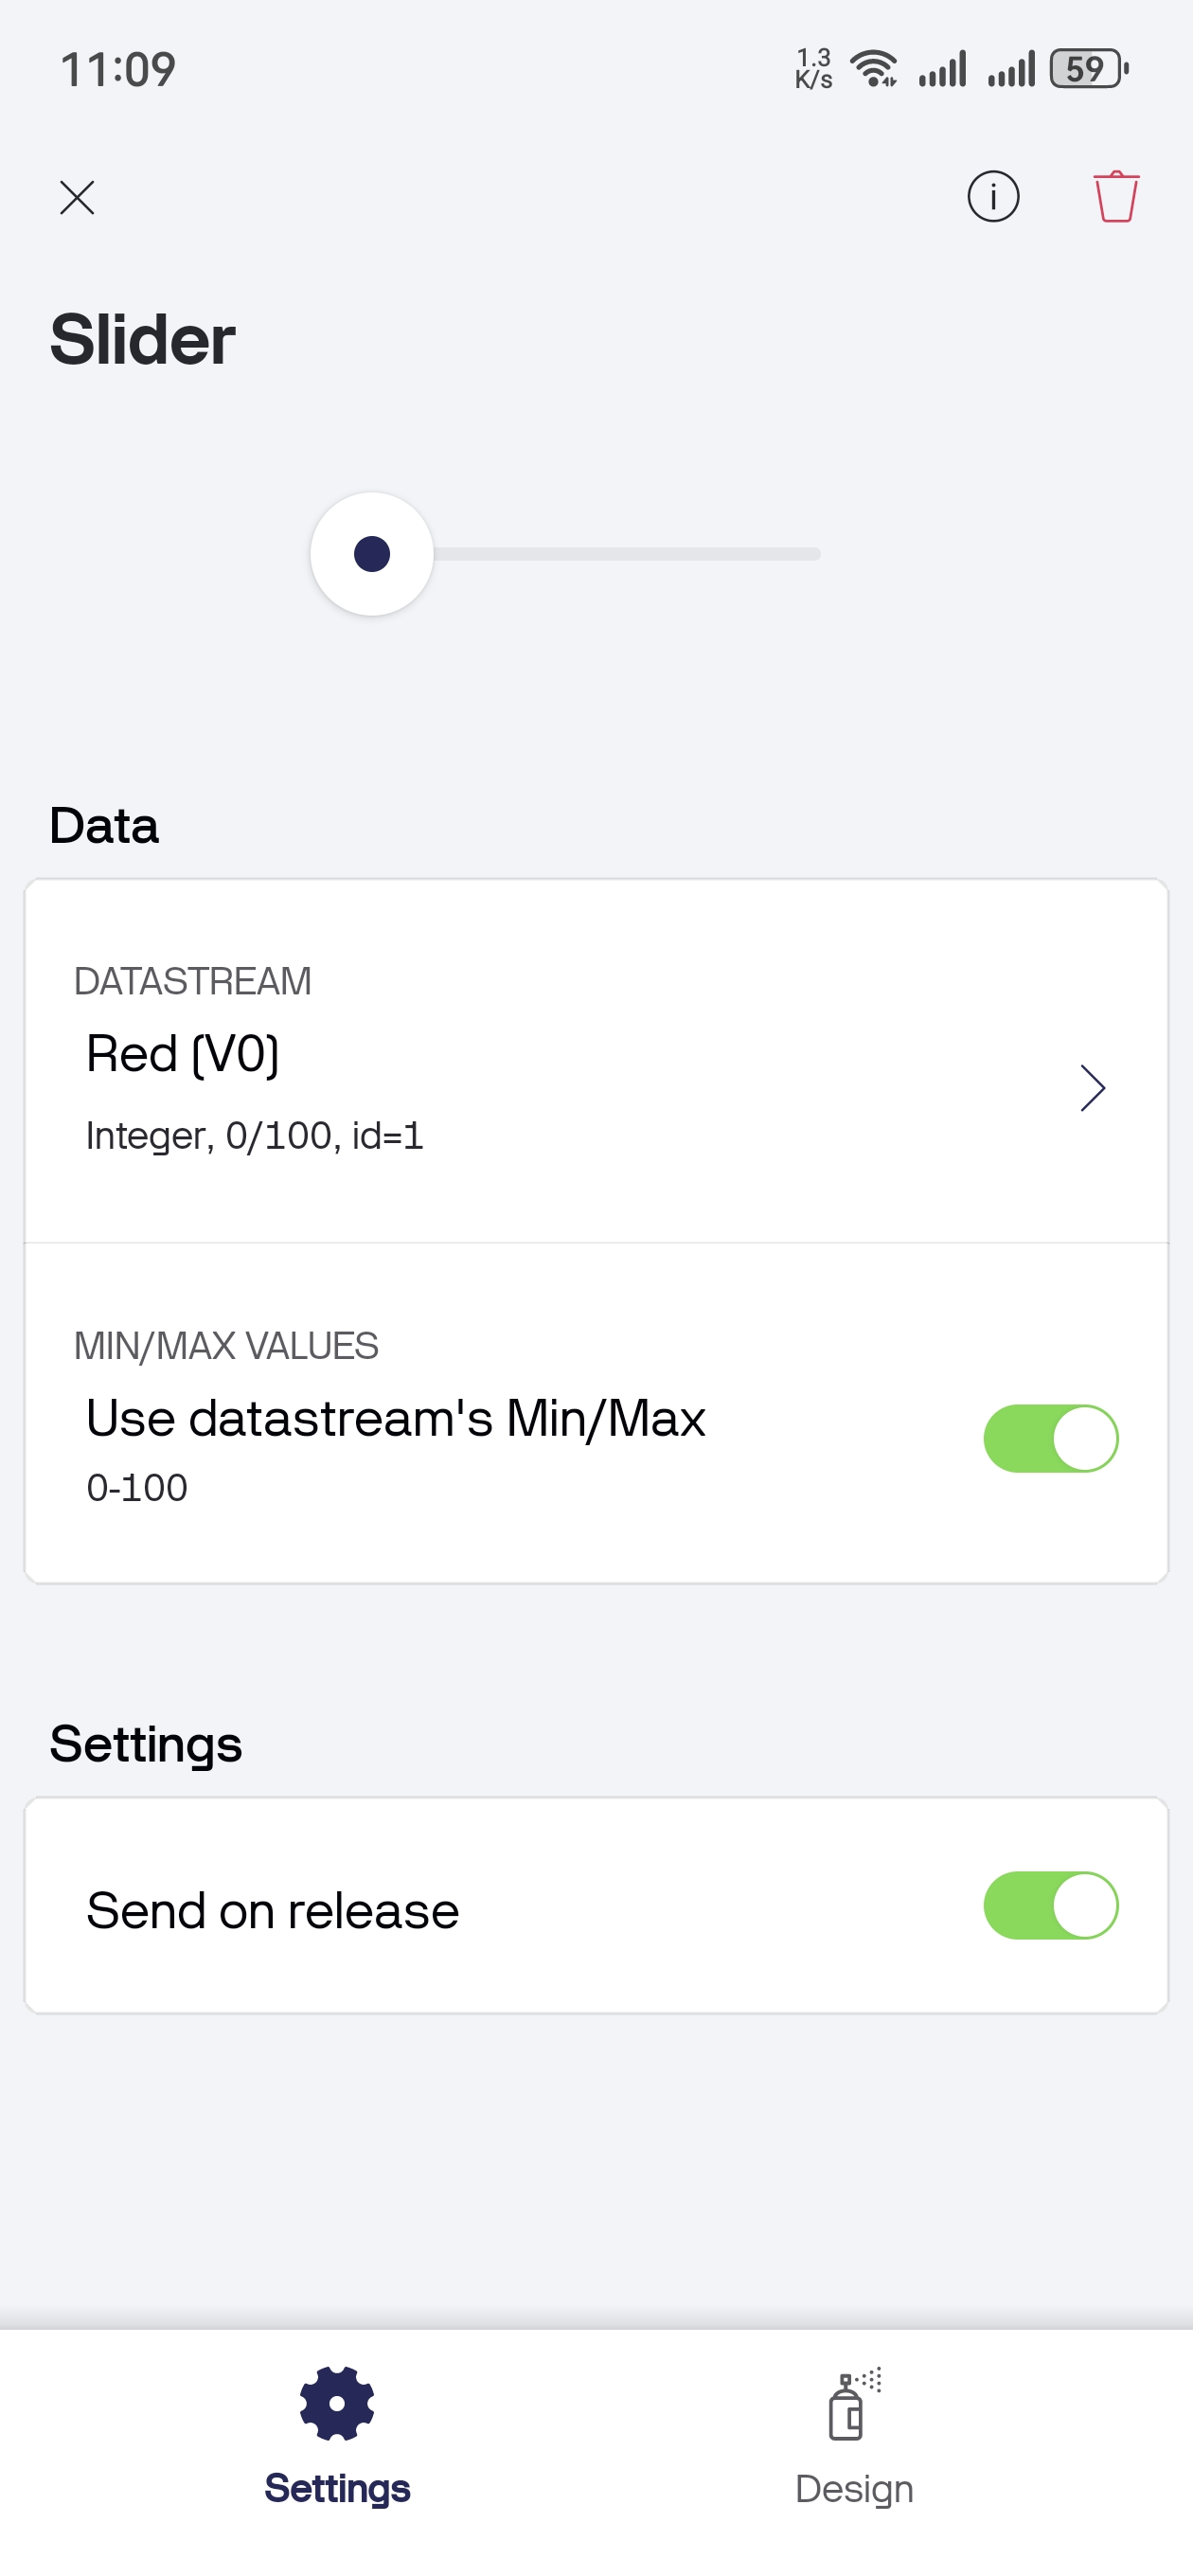
Step 4: Configure Widget Datastreams
For each widget, tap to configure and assign the correct datastream:
RGB Sliders: - Red Slider → Datastream V0 - Green Slider → Datastream V1 - Blue Slider → Datastream V2
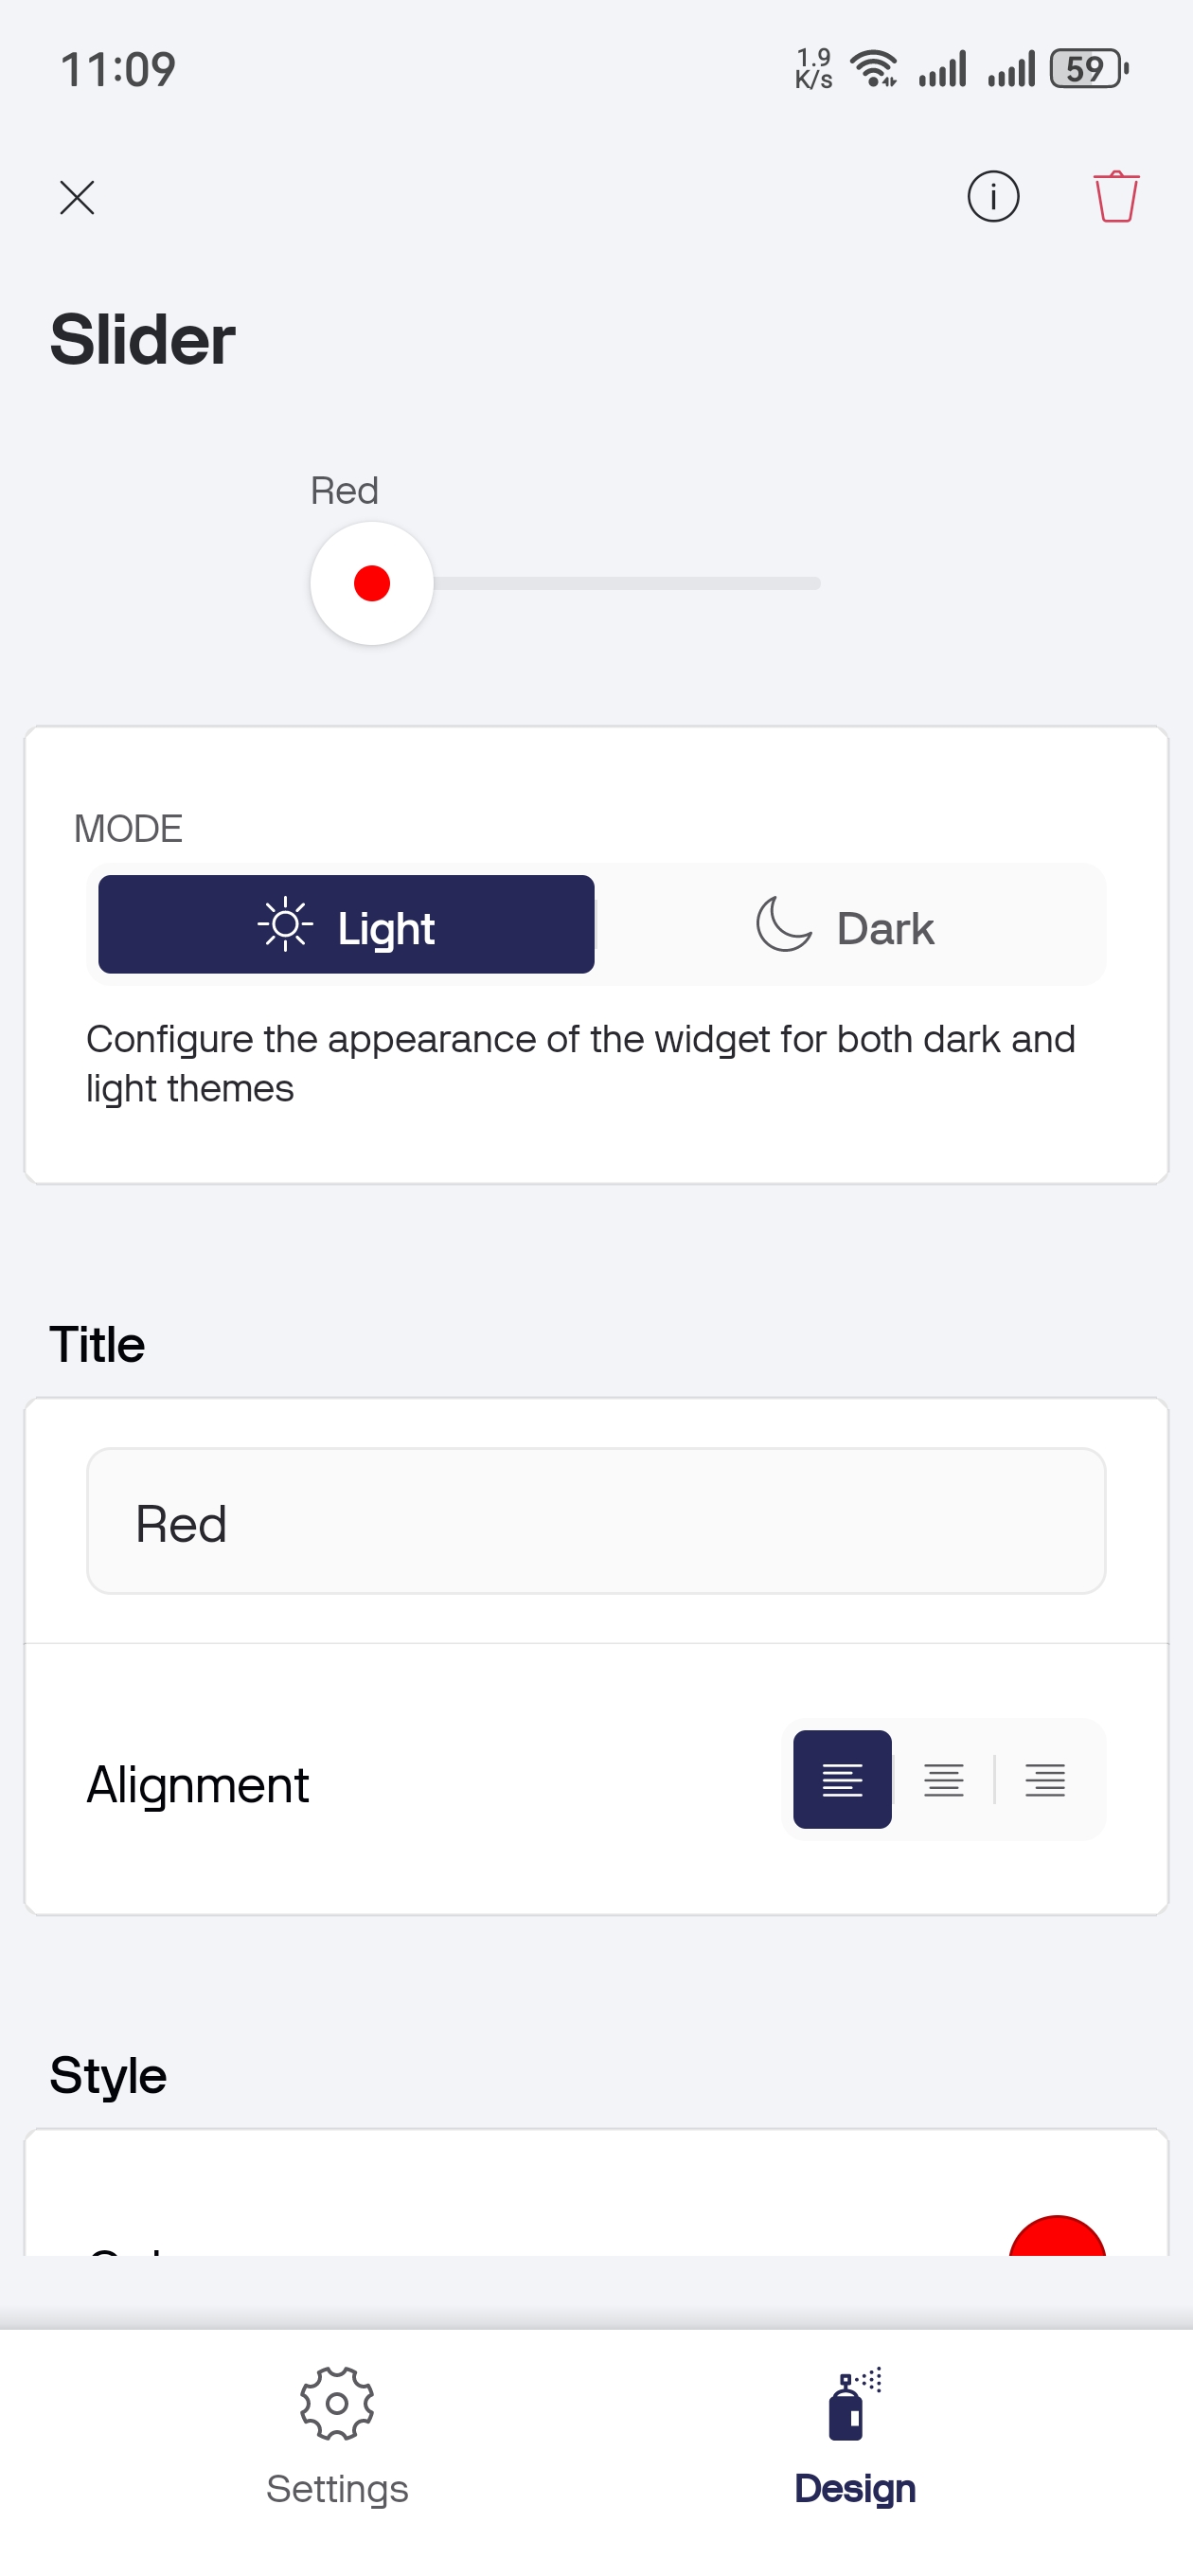
Step 5: Customize Widget Appearance
Tap “Design” to customize widget titles and colors:
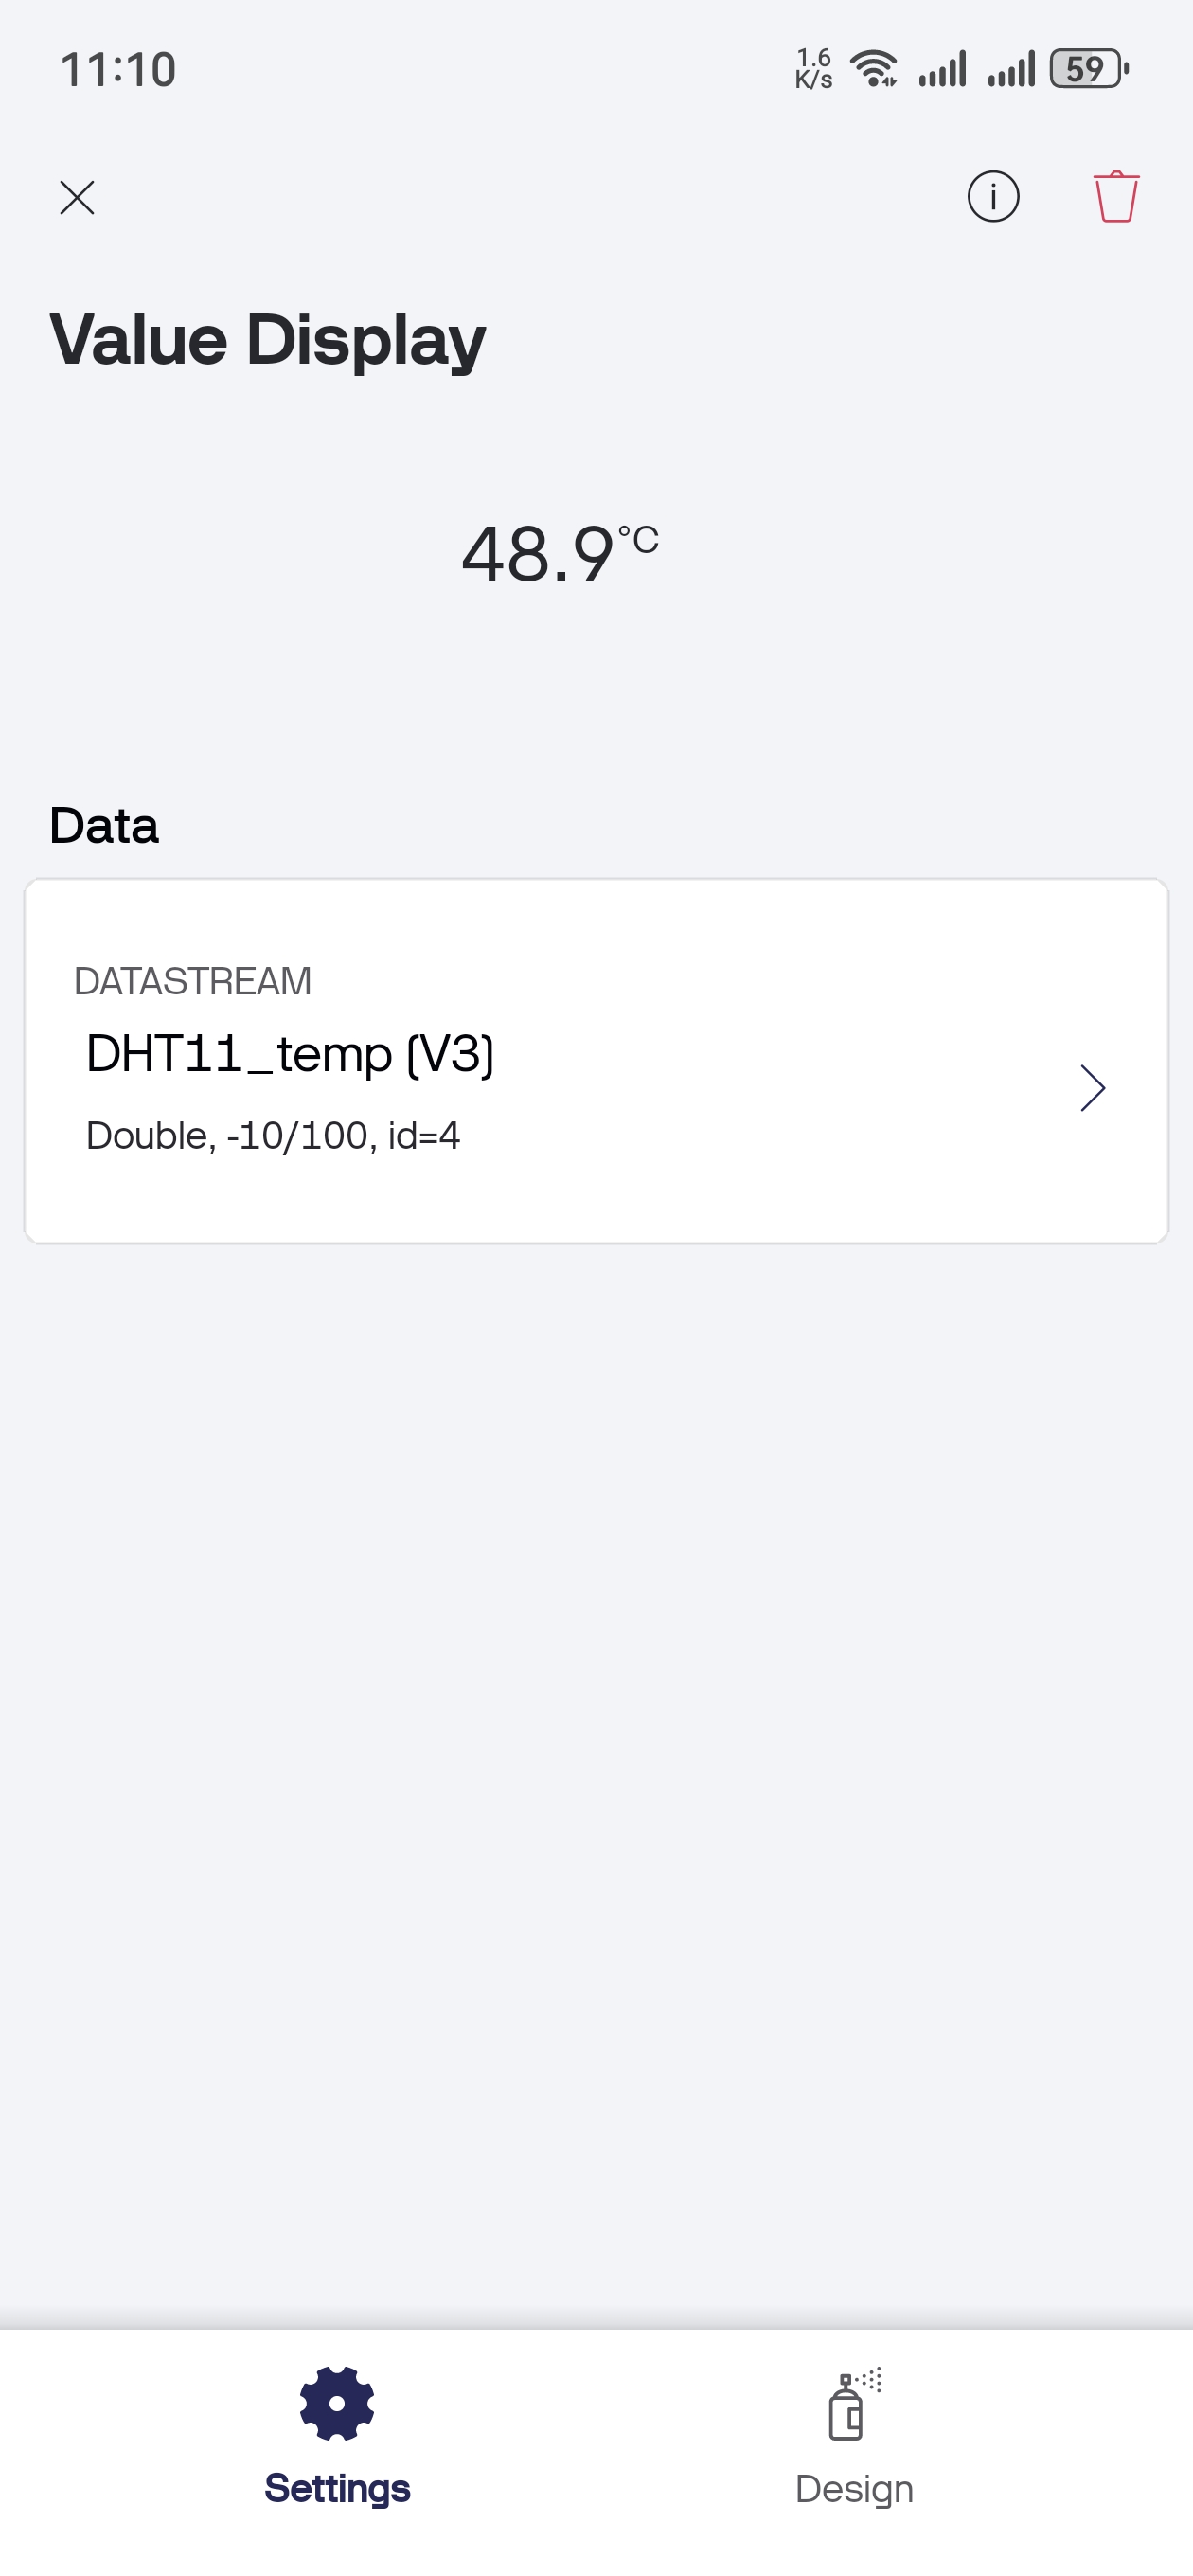
Temperature and Humidity Displays: - Temperature Display → Datastream V3 - Humidity Display → Datastream V4
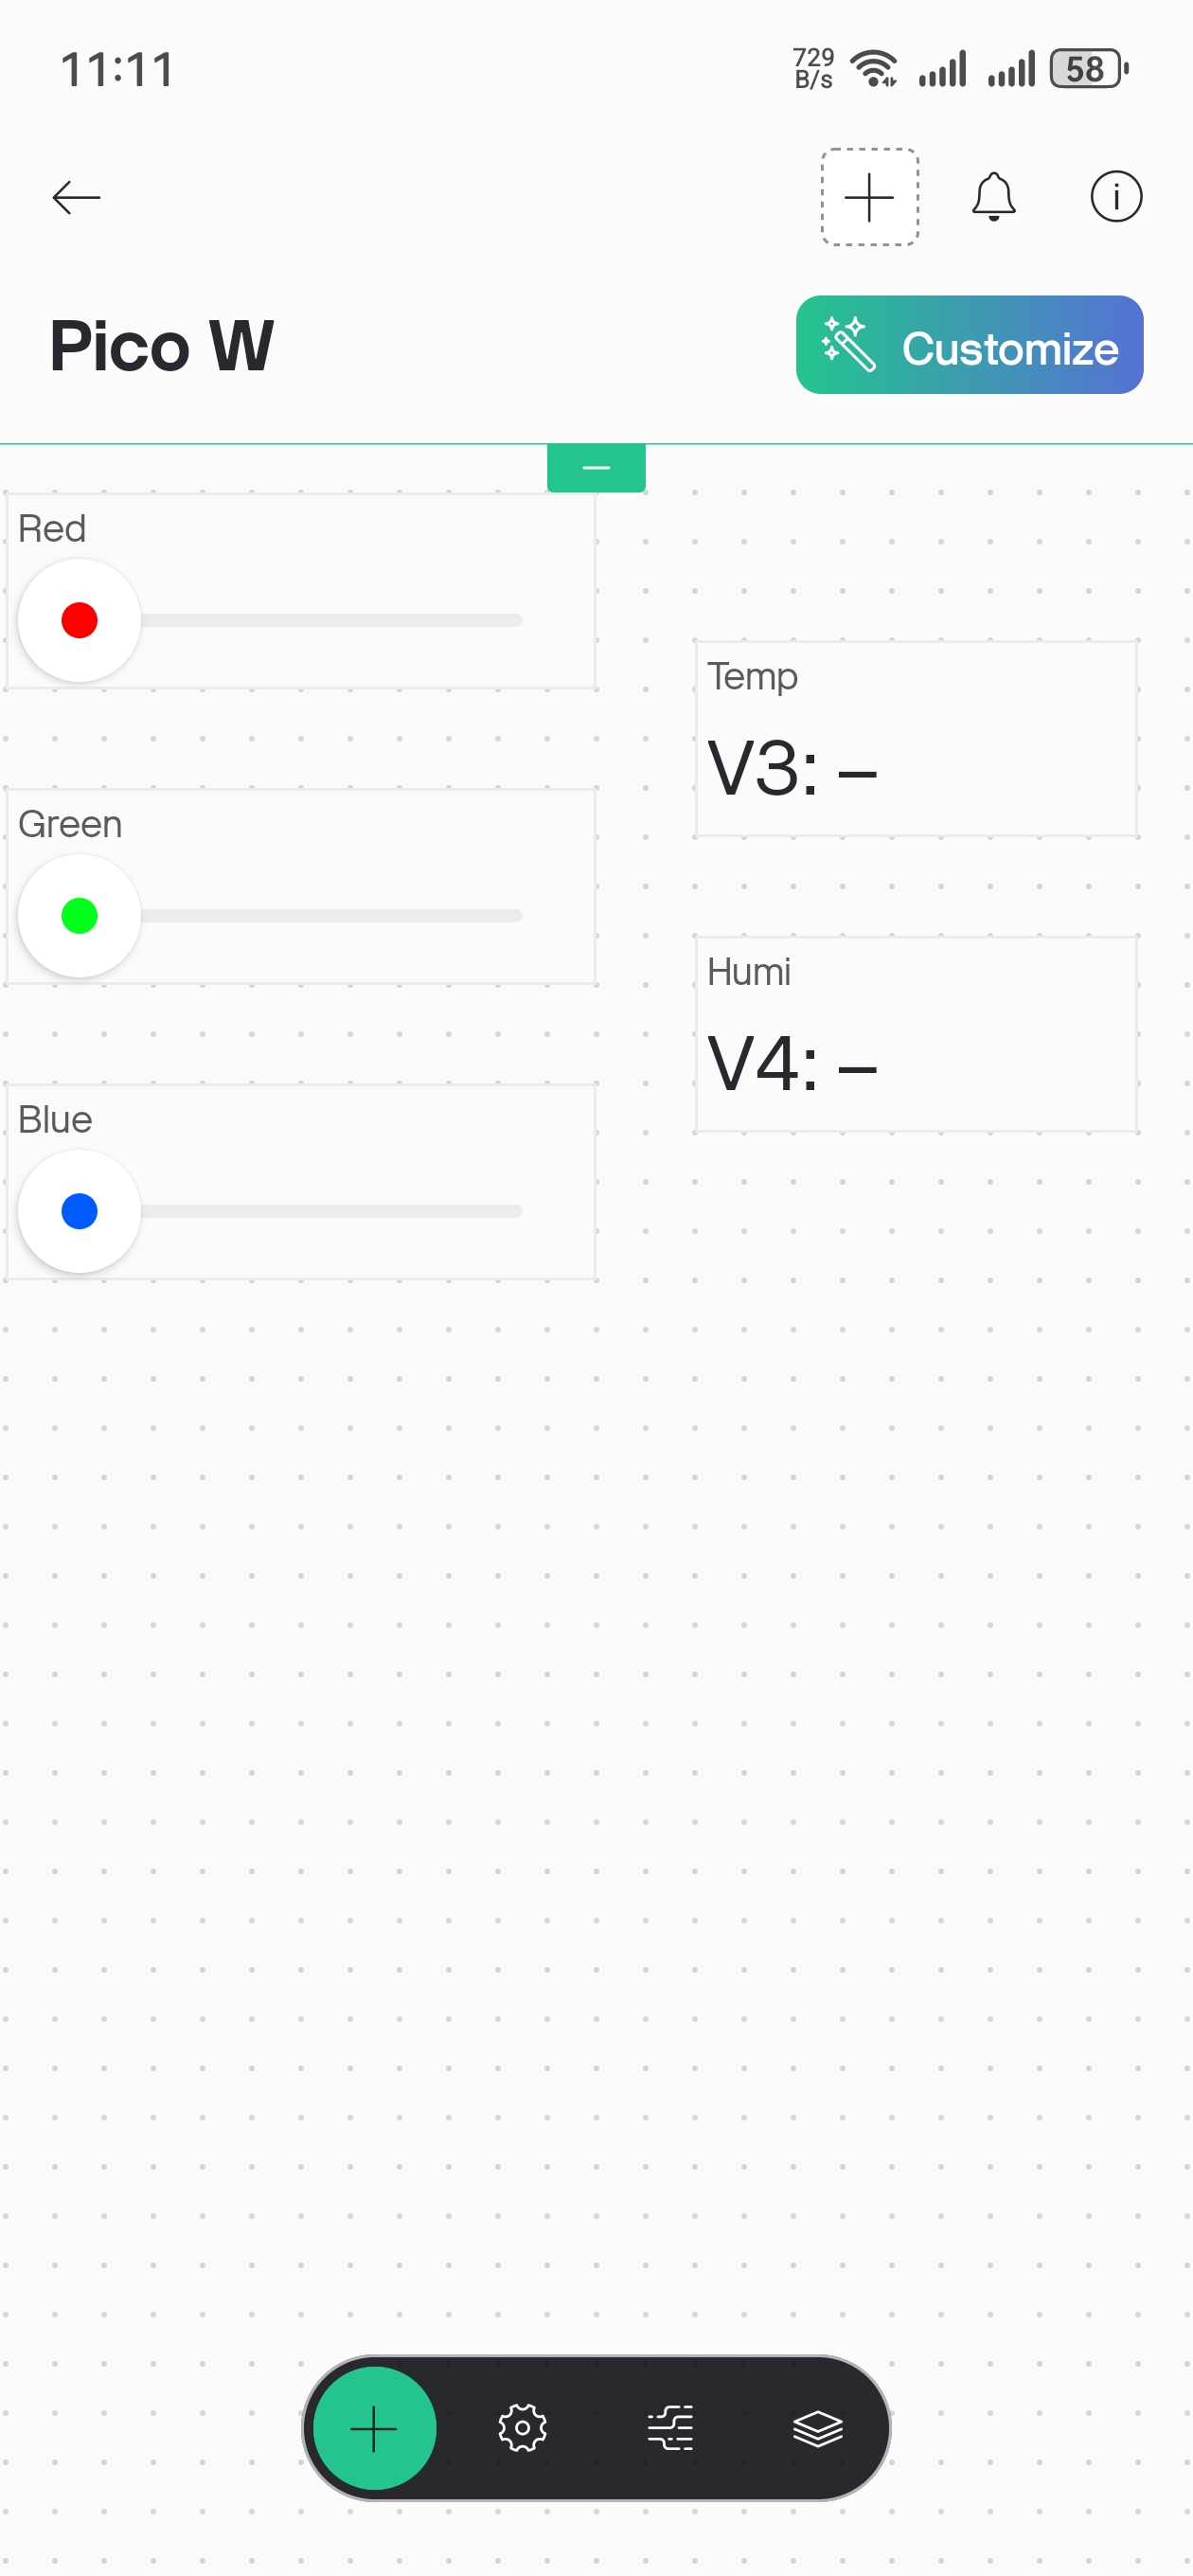
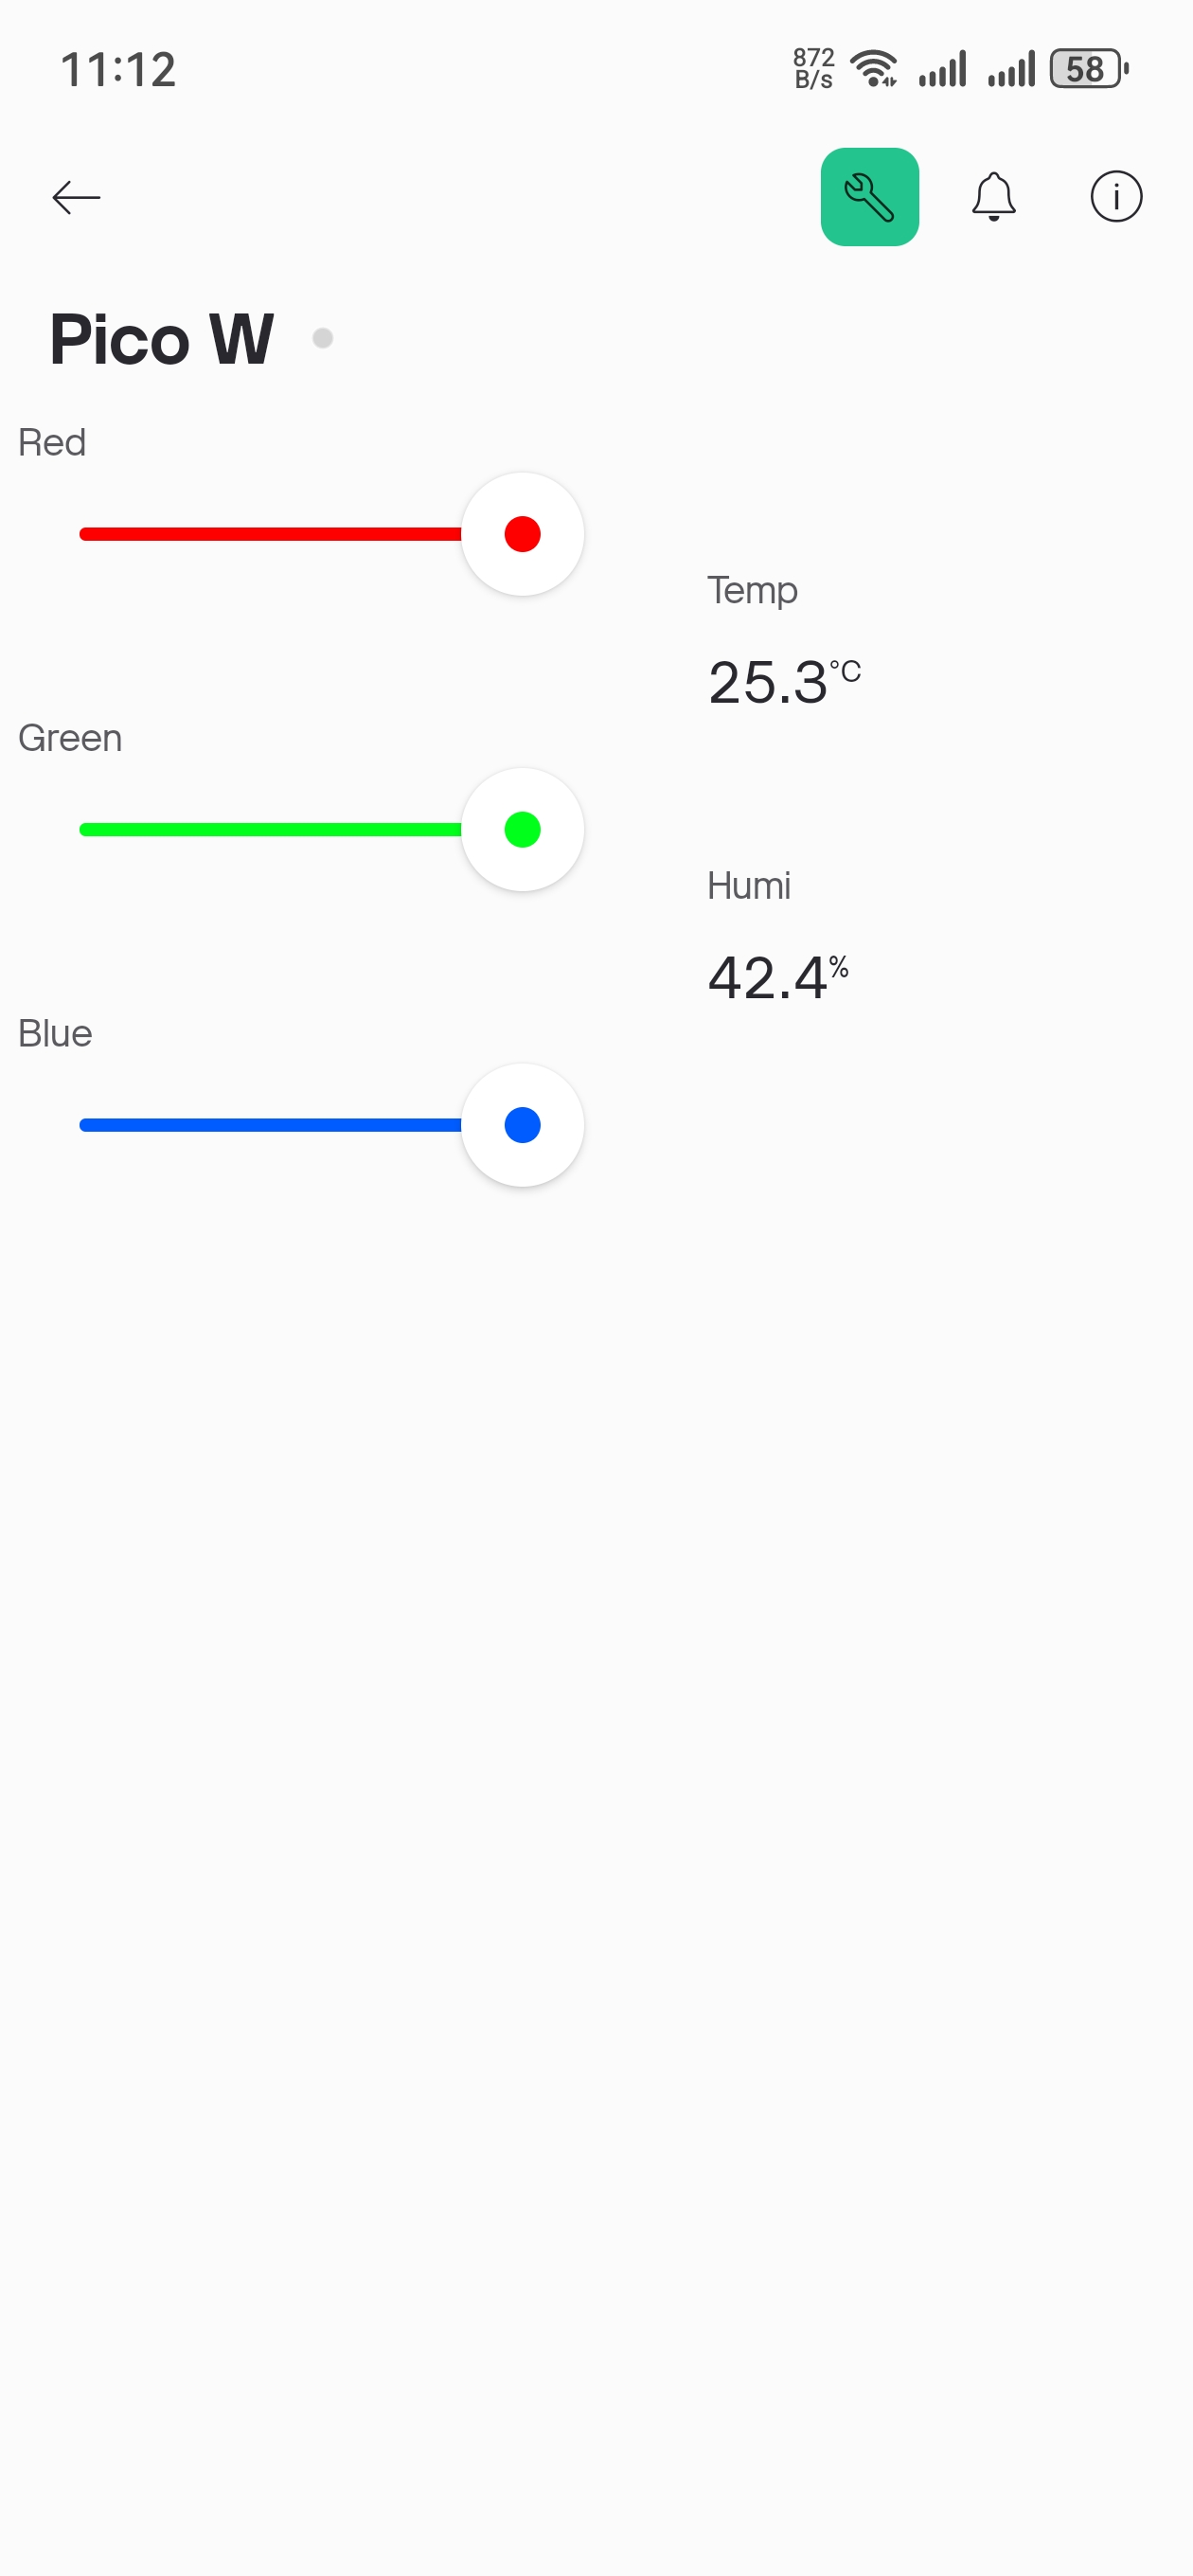
Step 6: Final Mobile Dashboard
Your completed mobile dashboard should look like this:
Step 7: Test Your IoT System
Save your mobile app layout
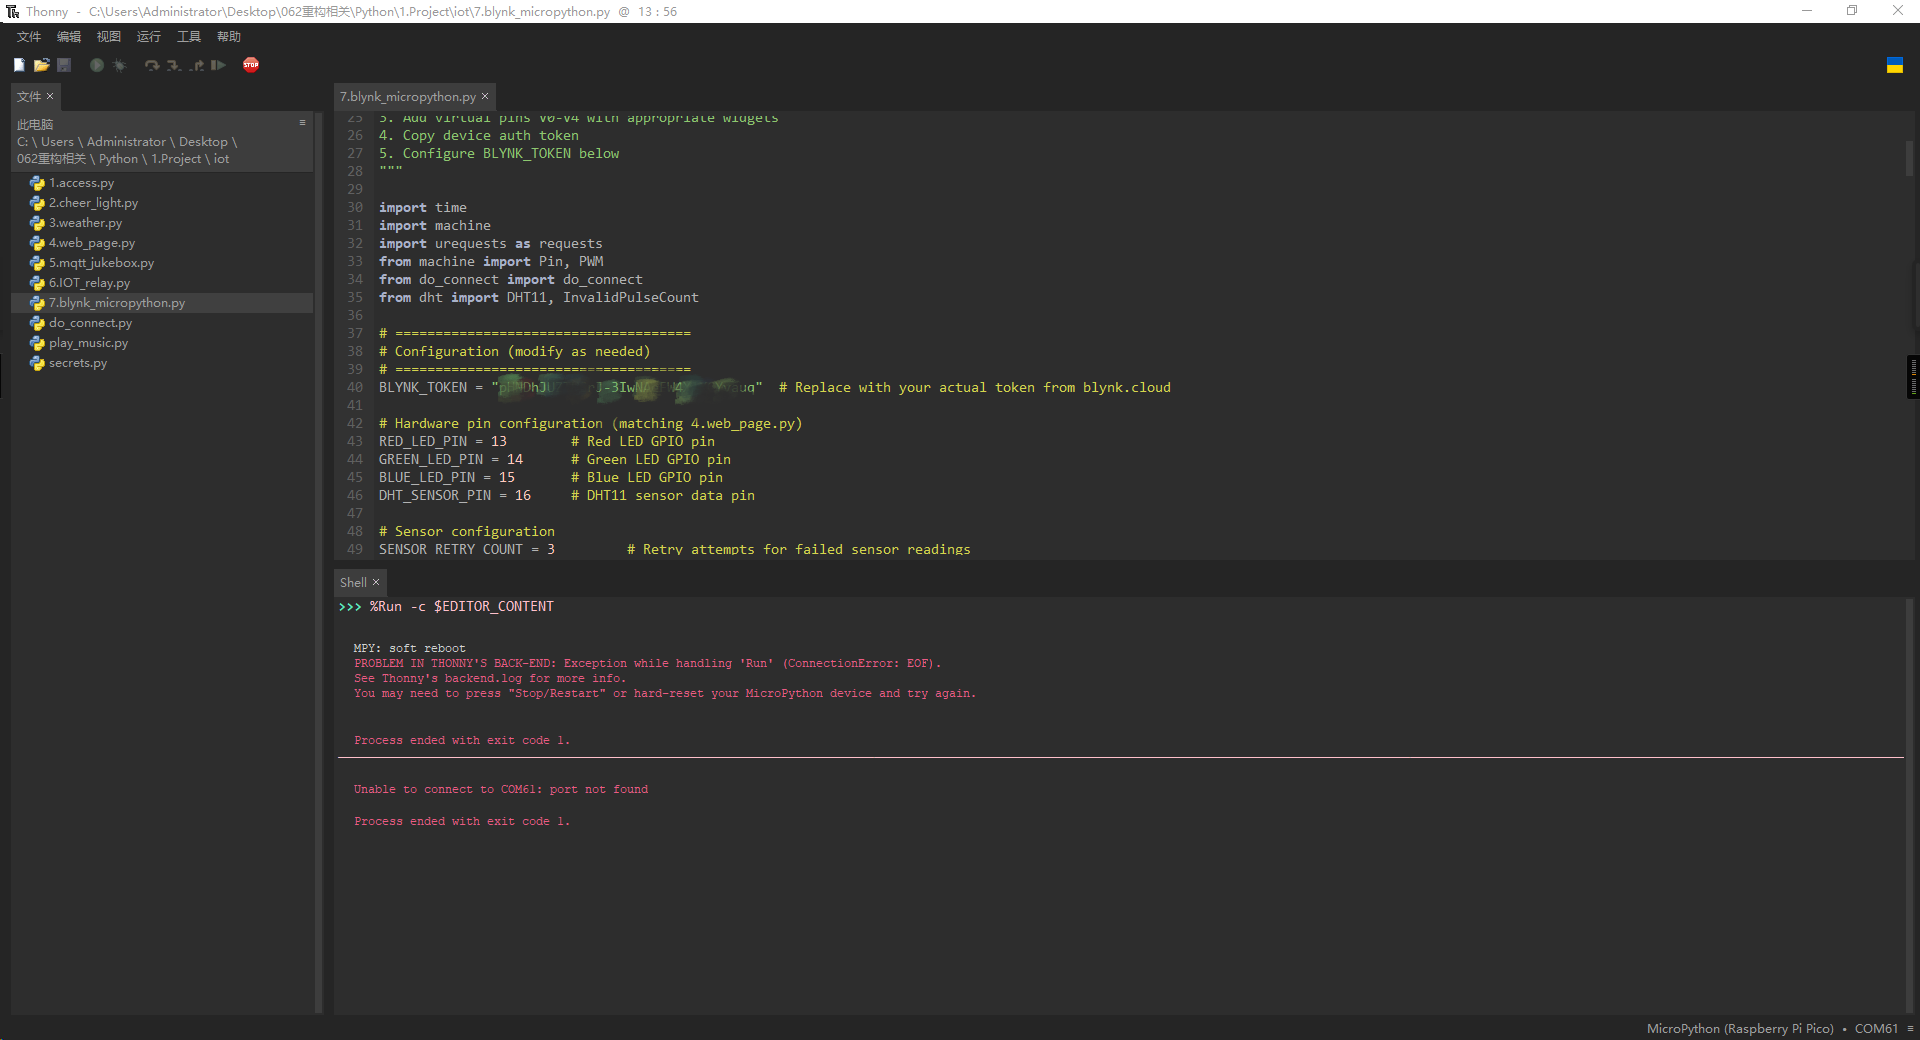
Run your MicroPython program in Thonny
Watch real-time updates - temperature and humidity values will appear on your phone
Control RGB LEDs using the sliders for instant brightness adjustment
The following is the program code:
"""
Blynk Smart Environmental Control System
MicroPython version with DHT11 sensor and RGB LED control

This program connects to Blynk IoT platform and provides:
- Environmental monitoring (temperature & humidity)
- RGB LED control via mobile app
- Real-time sensor data updates

Hardware Requirements:
- ESP32/ESP8266 with MicroPython
- DHT11 sensor connected to GPIO 16
- RGB LEDs: Red(GPIO 13), Green(GPIO 14), Blue(GPIO 15)

Blynk Virtual Pin Setup:
- V0: Red LED brightness (Slider 0-100)
- V1: Green LED brightness (Slider 0-100)
- V2: Blue LED brightness (Slider 0-100)
- V3: Temperature display (Value Display)
- V4: Humidity display (Value Display)

Setup Requirements:
1. Create account at blynk.cloud
2. Create new template and device
3. Add virtual pins V0-V4 with appropriate widgets
4. Copy device auth token
5. Configure BLYNK_TOKEN below
"""

import time
import machine
import urequests as requests
from machine import Pin, PWM
from do_connect import do_connect
from dht import DHT11, InvalidPulseCount

# =====================================
# Configuration (modify as needed)
# =====================================
BLYNK_TOKEN = "YOUR_BLYNK_TOKEN_HERE"  # Replace with your actual token from blynk.cloud

# Hardware pin configuration (matching 4.web_page.py)
RED_LED_PIN = 13        # Red LED GPIO pin
GREEN_LED_PIN = 14      # Green LED GPIO pin
BLUE_LED_PIN = 15       # Blue LED GPIO pin
DHT_SENSOR_PIN = 16     # DHT11 sensor data pin

# Sensor configuration
SENSOR_RETRY_COUNT = 3         # Retry attempts for failed sensor readings
SENSOR_UPDATE_INTERVAL = 10    # Send sensor data every 10 seconds
CONTROL_CHECK_INTERVAL = 1     # Check control commands every 1 second

# =====================================
# Hardware Initialization
# =====================================

# Initialize RGB LEDs with PWM for brightness control
print("Setting up RGB LED PWM pins...")
red_led = PWM(Pin(RED_LED_PIN))
green_led = PWM(Pin(GREEN_LED_PIN))
blue_led = PWM(Pin(BLUE_LED_PIN))

# Set PWM frequency (1000 Hz is good for LEDs)
red_led.freq(1000)
green_led.freq(1000)
blue_led.freq(1000)

# Turn off all LEDs initially (0% brightness)
red_led.duty_u16(0)
green_led.duty_u16(0)
blue_led.duty_u16(0)

# Initialize DHT11 sensor
print(f"Initializing DHT11 sensor on pin {DHT_SENSOR_PIN}")
sensor_pin = Pin(DHT_SENSOR_PIN, Pin.IN)
dht_sensor = DHT11(sensor_pin)

# =====================================
# Blynk API Functions
# =====================================

def blynk_write(token, pin, value):
    """
    Write value to Blynk virtual pin

    Args:
        token: Blynk authentication token
        pin: Virtual pin name (e.g., "V0")
        value: Value to write

    Returns:
        bool: True if successful, False otherwise
    """
    try:
        api_url = f"https://blynk.cloud/external/api/update?token={token}&{pin}={value}"
        response = requests.get(api_url)

        if response.status_code == 200:
            print(f"✓ Successfully updated {pin} = {value}")
            response.close()
            return True
        else:
            print(f"❌ Failed to update {pin}. Status: {response.status_code}")
            response.close()
            return False

    except Exception as e:
        print(f"❌ Error writing to Blynk: {e}")
        return False

def blynk_read(token, pin):
    """
    Read value from Blynk virtual pin

    Args:
        token: Blynk authentication token
        pin: Virtual pin name (e.g., "V0")

    Returns:
        str: Pin value or None if error
    """
    try:
        api_url = f"https://blynk.cloud/external/api/get?token={token}&{pin}"
        response = requests.get(api_url)

        if response.status_code == 200:
            value = response.text.strip()
            response.close()
            return value
        else:
            print(f"❌ Failed to read {pin}. Status: {response.status_code}")
            response.close()
            return None

    except Exception as e:
        print(f"❌ Error reading from Blynk: {e}")
        return None

# =====================================
# Sensor Functions
# =====================================

def read_sensor_data():
    """
    Read temperature and humidity from DHT11 sensor with retry logic

    Returns:
        tuple: (temperature, humidity) or (None, None) if failed
    """
    for attempt in range(SENSOR_RETRY_COUNT):
        try:
            dht_sensor.measure()
            temperature = dht_sensor.temperature
            humidity = dht_sensor.humidity

            # Validate sensor readings
            if temperature is not None and humidity is not None:
                print(f"📊 Sensor reading: {temperature}°C, {humidity}%")
                return temperature, humidity
            else:
                print(f"⚠️  Invalid sensor reading on attempt {attempt + 1}")

        except (OSError, InvalidPulseCount) as e:
            print(f"⚠️  Sensor read attempt {attempt + 1} failed: {e}")

        except Exception as e:
            print(f"❌ Unexpected sensor error on attempt {attempt + 1}: {e}")

        # Small delay before retry
        if attempt < SENSOR_RETRY_COUNT - 1:
            time.sleep(0.1)

    print("❌ All sensor read attempts failed")
    return None, None

# =====================================
# RGB LED Control Functions
# =====================================

def brightness_to_pwm(brightness_percent):
    """
    Convert brightness percentage (0-100) to PWM duty cycle (0-65535)

    Args:
        brightness_percent: Brightness value from 0-100

    Returns:
        int: PWM duty cycle value (0-65535)
    """
    if brightness_percent < 0:
        brightness_percent = 0
    elif brightness_percent > 100:
        brightness_percent = 100

    # Map 0-100 to 0-65535
    return int((brightness_percent / 100.0) * 65535)

def set_rgb_brightness(red_brightness=0, green_brightness=0, blue_brightness=0):
    """
    Set RGB LED brightness using PWM control

    Args:
        red_brightness: Red LED brightness (0-100)
        green_brightness: Green LED brightness (0-100)
        blue_brightness: Blue LED brightness (0-100)
    """
    # Convert percentages to PWM values
    red_pwm = brightness_to_pwm(red_brightness)
    green_pwm = brightness_to_pwm(green_brightness)
    blue_pwm = brightness_to_pwm(blue_brightness)

    # Set PWM duty cycles
    red_led.duty_u16(red_pwm)
    green_led.duty_u16(green_pwm)
    blue_led.duty_u16(blue_pwm)

    # Display status
    active_colors = []
    if red_brightness > 0:
        active_colors.append(f"Red({red_brightness}%)")
    if green_brightness > 0:
        active_colors.append(f"Green({green_brightness}%)")
    if blue_brightness > 0:
        active_colors.append(f"Blue({blue_brightness}%)")

    if active_colors:
        print(f"🌈 RGB LEDs: {', '.join(active_colors)}")
    else:
        print("💡 All RGB LEDs: OFF (0%)")

def turn_off_all_leds():
    """Turn off all RGB LEDs (set brightness to 0%)"""
    red_led.duty_u16(0)
    green_led.duty_u16(0)
    blue_led.duty_u16(0)
    print("💡 All RGB LEDs turned OFF (0%)")

# =====================================
# Main Program
# =====================================

def main():
    """Main program loop for Smart Environmental Control System"""

    print("🚀 Starting Blynk Smart Environmental Control System")
    print("=" * 55)

    # Check configuration
    if BLYNK_TOKEN == "YOUR_BLYNK_TOKEN_HERE":
        print("❌ ERROR: Please configure your BLYNK_TOKEN")
        print("   Get your token from: https://blynk.cloud")
        print("   Edit this file and replace BLYNK_TOKEN value")
        return

    # Connect to WiFi
    print("📶 Connecting to WiFi...")
    try:
        do_connect()
        print("✓ WiFi connected successfully")
    except Exception as e:
        print(f"❌ WiFi connection failed: {e}")
        return

    print("🏠 Smart Environmental Control System Ready!")
    print(f"🔑 Using token: {BLYNK_TOKEN[:8]}...")
    print("📊 DHT11 sensor monitoring temperature & humidity")
    print("🔴🟢🔵 RGB LEDs controlled via Blynk app")
    print("📱 Virtual Pins: V0=Red, V1=Green, V2=Blue, V3=Temp, V4=Hum")
    print("⏹️  Press Ctrl+C to exit")
    print("-" * 55)

    # Initialize state tracking for RGB brightness values
    previous_rgb_brightness = {"red": None, "green": None, "blue": None}
    last_sensor_update = 0
    error_count = 0
    max_errors = 5

    try:
        while True:
            current_time = time.time()

            try:
                # ===== Control RGB LEDs based on Blynk slider values =====

                # Read RGB brightness sliders (0-100)
                red_brightness = blynk_read(BLYNK_TOKEN, "V0")
                green_brightness = blynk_read(BLYNK_TOKEN, "V1")
                blue_brightness = blynk_read(BLYNK_TOKEN, "V2")

                # Process RGB brightness controls
                rgb_changed = False

                # Check for brightness changes
                if red_brightness != previous_rgb_brightness["red"] and red_brightness is not None:
                    previous_rgb_brightness["red"] = red_brightness
                    rgb_changed = True

                if green_brightness != previous_rgb_brightness["green"] and green_brightness is not None:
                    previous_rgb_brightness["green"] = green_brightness
                    rgb_changed = True

                if blue_brightness != previous_rgb_brightness["blue"] and blue_brightness is not None:
                    previous_rgb_brightness["blue"] = blue_brightness
                    rgb_changed = True

                # Update RGB LEDs if any brightness changed
                if rgb_changed:
                    try:
                        # Convert string values to integers
                        red_val = int(red_brightness) if red_brightness is not None else 0
                        green_val = int(green_brightness) if green_brightness is not None else 0
                        blue_val = int(blue_brightness) if blue_brightness is not None else 0

                        # Set LED brightness
                        set_rgb_brightness(red_val, green_val, blue_val)

                    except ValueError as e:
                        print(f"⚠️  Invalid brightness value: {e}")
                        # Set to safe default values
                        set_rgb_brightness(0, 0, 0)

                # ===== Read and Send Sensor Data =====

                # Send sensor data every SENSOR_UPDATE_INTERVAL seconds
                if current_time - last_sensor_update >= SENSOR_UPDATE_INTERVAL:
                    temperature, humidity = read_sensor_data()

                    if temperature is not None and humidity is not None:
                        # Send temperature and humidity to Blynk
                        temp_success = blynk_write(BLYNK_TOKEN, "V3", str(temperature))
                        hum_success = blynk_write(BLYNK_TOKEN, "V4", str(humidity))

                        if temp_success and hum_success:
                            print(f"✅ Sensor data sent: {temperature}°C, {humidity}%")
                        else:
                            print("⚠️  Failed to send sensor data to Blynk")
                    else:
                        # Send error values to Blynk
                        blynk_write(BLYNK_TOKEN, "V3", "Error")
                        blynk_write(BLYNK_TOKEN, "V4", "Error")
                        print("❌ Sensor error - sent error values to Blynk")

                    last_sensor_update = current_time

                # Reset error count on successful operation
                error_count = 0

                # Wait before next control check
                time.sleep(CONTROL_CHECK_INTERVAL)

            except KeyboardInterrupt:
                print("\n🛑 Program stopped by user")
                break

            except Exception as e:
                print(f"❌ Loop error: {e}")
                error_count += 1

                if error_count >= max_errors:
                    print("❌ Too many errors. Restarting device...")
                    time.sleep(2)
                    machine.reset()
                else:
                    time.sleep(2)  # Wait before retry

    except Exception as e:
        print(f"❌ Fatal error: {e}")

    finally:
        # Cleanup
        print("🧹 Cleaning up...")
        turn_off_all_leds()  # Sets all RGB LEDs to 0% brightness
        print("✓ Hardware cleanup completed")

# =====================================
# Program Entry Point
# =====================================

if __name__ == "__main__":
    main()
🔧 How the Professional Blynk System Works
🌐 Step 1: Blynk Cloud Architecture Understanding The Blynk platform uses a sophisticated cloud-based architecture:
# Configuration with secure token authentication
BLYNK_TOKEN = "YOUR_BLYNK_TOKEN_HERE"  # Unique device identifier

# Virtual Pin Mapping for IoT Control
# V0: Red LED brightness (Slider 0-100)
# V1: Green LED brightness (Slider 0-100)
# V2: Blue LED brightness (Slider 0-100)
# V3: Temperature display (Value Display)
# V4: Humidity display (Value Display)
Cloud Platform Features: - Global Access: Control devices from anywhere with internet - Secure Authentication: Token-based device security - Real-time Communication: Instant updates between app and device - Virtual Pins: Abstracted I/O that works across platforms
⚡ Step 2: Professional PWM LED Control Advanced RGB control with smooth brightness adjustment:
def brightness_to_pwm(brightness_percent):
    """Convert brightness percentage (0-100) to PWM duty cycle (0-65535)"""
    if brightness_percent < 0:
        brightness_percent = 0
    elif brightness_percent > 100:
        brightness_percent = 100

    # Map 0-100 to 0-65535 (16-bit PWM)
    return int((brightness_percent / 100.0) * 65535)

def set_rgb_brightness(red_brightness=0, green_brightness=0, blue_brightness=0):
    """Set RGB LED brightness using PWM control"""
    # Convert percentages to PWM values
    red_pwm = brightness_to_pwm(red_brightness)
    green_pwm = brightness_to_pwm(green_brightness)
    blue_pwm = brightness_to_pwm(blue_brightness)

    # Set PWM duty cycles for smooth brightness control
    red_led.duty_u16(red_pwm)
    green_led.duty_u16(green_pwm)
    blue_led.duty_u16(blue_pwm)
Professional PWM Features: - 16-bit Resolution: 65,536 brightness levels for smooth transitions - Percentage Mapping: User-friendly 0-100% control - Input Validation: Prevents invalid brightness values - Multi-color Support: Independent control of each RGB channel
📡 Step 3: Blynk API Communication Professional HTTP-based communication with Blynk cloud:
def blynk_write(token, pin, value):
    """Write value to Blynk virtual pin with error handling"""
    try:
        api_url = f"https://blynk.cloud/external/api/update?token={token}&{pin}={value}"
        response = requests.get(api_url)

        if response.status_code == 200:
            print(f"✓ Successfully updated {pin} = {value}")
            response.close()
            return True
        else:
            print(f"❌ Failed to update {pin}. Status: {response.status_code}")
            response.close()
            return False
    except Exception as e:
        print(f"❌ Error writing to Blynk: {e}")
        return False

def blynk_read(token, pin):
    """Read value from Blynk virtual pin with error handling"""
    try:
        api_url = f"https://blynk.cloud/external/api/get?token={token}&{pin}"
        response = requests.get(api_url)

        if response.status_code == 200:
            value = response.text.strip()
            response.close()
            return value
        else:
            response.close()
            return None
    except Exception as e:
        print(f"❌ Error reading from Blynk: {e}")
        return None
API Communication Features: - RESTful API: Standard HTTP GET requests for IoT communication - Error Handling: Comprehensive exception management - Resource Management: Proper HTTP connection cleanup - Status Validation: HTTP status code checking
📊 Step 4: Smart Sensor Integration Professional sensor reading with retry logic (same as 7.4):
def read_sensor_data():
    """Read temperature and humidity from DHT11 with retry logic"""
    for attempt in range(SENSOR_RETRY_COUNT):
        try:
            dht_sensor.measure()
            temperature = dht_sensor.temperature
            humidity = dht_sensor.humidity

            # Validate sensor readings
            if temperature is not None and humidity is not None:
                print(f"📊 Sensor reading: {temperature}°C, {humidity}%")
                return temperature, humidity
            else:
                print(f"⚠️  Invalid sensor reading on attempt {attempt + 1}")

        except (OSError, InvalidPulseCount) as e:
            print(f"⚠️  Sensor read attempt {attempt + 1} failed: {e}")

        # Small delay before retry
        if attempt < SENSOR_RETRY_COUNT - 1:
            time.sleep(0.1)
Smart Sensor Features: - Retry Logic: Up to 3 attempts for reliable readings - Error Categorization: Handles different DHT11 error types - Validation: Checks for valid temperature and humidity values - Graceful Degradation: Continues operation despite sensor failures
🔄 Step 5: Intelligent Main Control Loop Professional main loop with state management and error recovery:
def main():
    """Main program loop with change detection and error handling"""

    # Initialize state tracking for RGB brightness values
    previous_rgb_brightness = {"red": None, "green": None, "blue": None}
    last_sensor_update = 0
    error_count = 0
    max_errors = 5

    while True:
        current_time = time.time()

        try:
            # ===== Smart RGB Control with Change Detection =====
            red_brightness = blynk_read(BLYNK_TOKEN, "V0")
            green_brightness = blynk_read(BLYNK_TOKEN, "V1")
            blue_brightness = blynk_read(BLYNK_TOKEN, "V2")

            # Check for brightness changes (prevents unnecessary updates)
            rgb_changed = False
            if red_brightness != previous_rgb_brightness["red"] and red_brightness is not None:
                previous_rgb_brightness["red"] = red_brightness
                rgb_changed = True

            # Update RGB LEDs only if brightness changed
            if rgb_changed:
                red_val = int(red_brightness) if red_brightness is not None else 0
                green_val = int(green_brightness) if green_brightness is not None else 0
                blue_val = int(blue_brightness) if blue_brightness is not None else 0
                set_rgb_brightness(red_val, green_val, blue_val)

            # ===== Periodic Sensor Data Updates =====
            if current_time - last_sensor_update >= SENSOR_UPDATE_INTERVAL:
                temperature, humidity = read_sensor_data()

                if temperature is not None and humidity is not None:
                    # Send sensor data to Blynk cloud
                    temp_success = blynk_write(BLYNK_TOKEN, "V3", str(temperature))
                    hum_success = blynk_write(BLYNK_TOKEN, "V4", str(humidity))

                    if temp_success and hum_success:
                        print(f"✅ Sensor data sent: {temperature}°C, {humidity}%")
                else:
                    # Send error values to mobile app
                    blynk_write(BLYNK_TOKEN, "V3", "Error")
                    blynk_write(BLYNK_TOKEN, "V4", "Error")

                last_sensor_update = current_time

            # Reset error count on successful operation
            error_count = 0
            time.sleep(CONTROL_CHECK_INTERVAL)

        except Exception as e:
            error_count += 1
            if error_count >= max_errors:
                print("❌ Too many errors. Restarting device...")
                machine.reset()
Professional Main Loop Features: - Change Detection: Only updates LEDs when brightness values change - State Management: Tracks previous values to prevent unnecessary operations - Timed Updates: Sensor data sent every 10 seconds, controls checked every 1 second - Error Recovery: Automatic device restart after multiple consecutive errors - Resource Optimization: Efficient polling and minimal API calls
🛡️ Step 6: Professional Error Handling and Cleanup Comprehensive error management and resource cleanup:
try:
    # Main program execution
    main()
except KeyboardInterrupt:
    print("\\n🛑 Program stopped by user")
except Exception as e:
    print(f"❌ Fatal error: {e}")
finally:
    # Cleanup hardware resources
    print("🧹 Cleaning up...")
    turn_off_all_leds()  # Sets all RGB LEDs to 0% brightness
    print("✓ Hardware cleanup completed")
✨ Key Advantages of Blynk vs. Web Server (Chapter 7.4):
📱 Mobile-First Design: - Native App Experience: Optimized for touchscreens and mobile interaction - Offline Capabilities: App retains last known state when offline - Push Notifications: Real-time alerts and status updates - Professional Widgets: Sliders, graphs, buttons designed for mobile
☁️ Cloud Infrastructure: - Global Accessibility: Control from anywhere with internet connection - Scalability: Easily add more devices to your dashboard - Data Storage: Historical data logging and analysis - Multi-platform: Same backend supports iOS, Android, and web
🔧 Development Benefits: - No Mobile Coding: Create professional mobile apps without programming skills - Rapid Prototyping: Quick setup and iteration of IoT interfaces - Professional UI: Beautiful, responsive interface components - Cross-platform: Works on any smartphone or tablet
⚡ Performance Features: - Efficient Communication: Optimized HTTP API calls - Change Detection: Only updates when values actually change - Error Recovery: Robust error handling and automatic restart - Resource Management: Proper cleanup and memory management
This Blynk implementation demonstrates professional IoT development practices suitable for commercial applications, combining mobile-first design with robust backend communication!