7.6 IoT Controlled Relay
In this project, we will build an IoT Relay using Raspberry Pi Pico W WiFi and control the Relay via a Web Server. We will use Thonny IDE to program the Raspberry Pi Pico W using MicroPython Code. It’s a great way to build a Wi-Fi switch to turn on and off any electrical device spending very little money.
This DIY IoT Relay based on the Raspberry Pi Pico W Wi Fi + Bluetooth module can be used to control High Power Devices like Water Pumps, Air Conditioners, Heaters, and other High Ampere loads. The best thing about this IoT Relay is that it can be controlled remotely in a local network using WiFi technology. The cell phone or any web application can be used to access the Web Server. Using the web page, you can turn ON/OFF any appliances at your home.
Component List
Raspberry Pi Pico W x1
MicroUSB cable x1
830 Tie-Points Breadboard x1
Resistor 220Ω x1
LED x1
Relay Module x1
Jumper Wire Several
Warning
Modification of electrical appliances comes with great danger, do not try it lightly, please do it under the guidance of professionals.
Connect
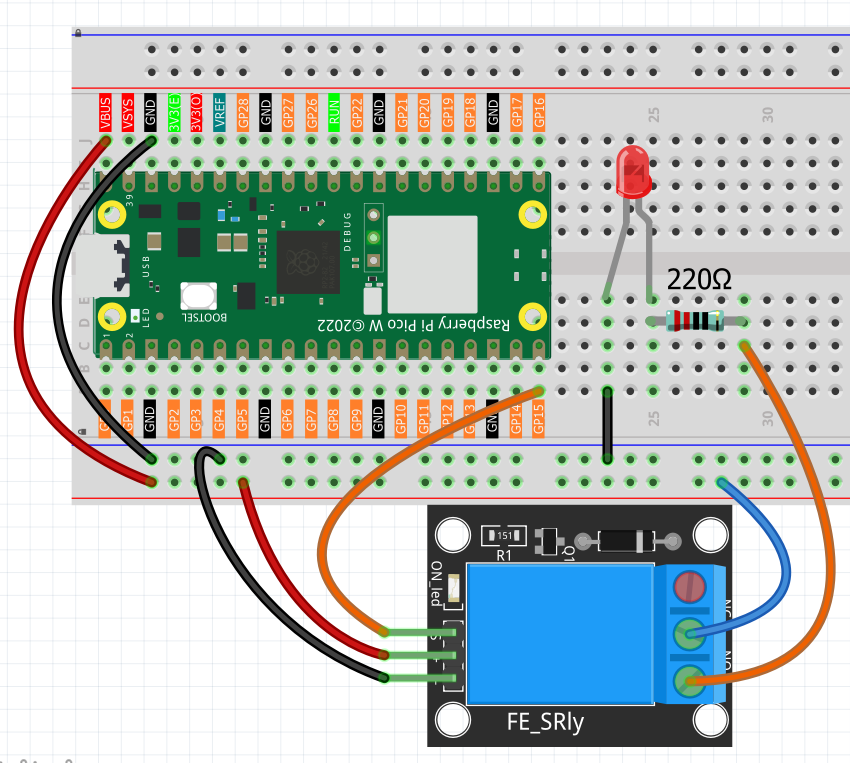
This circuit is based on 1.16 Circuit Control with Relay.
Code
Note
Open the
6.IOT_relay.pyfile under the path ofUltimate-Starter-Kit-for-Pico-W\Python\1.Project\iotor copy this code into Thonny, then click “Run Current Script” or simply press F5 to run it.Don’t forget to click on the “MicroPython (Raspberry Pi Pico)” interpreter in the bottom right corner.
Before running the code, you need to make sure you have do_connect.py and secrets.py scripts in your Pico W, if not please refer to 8.1 Access to the Network to create them.

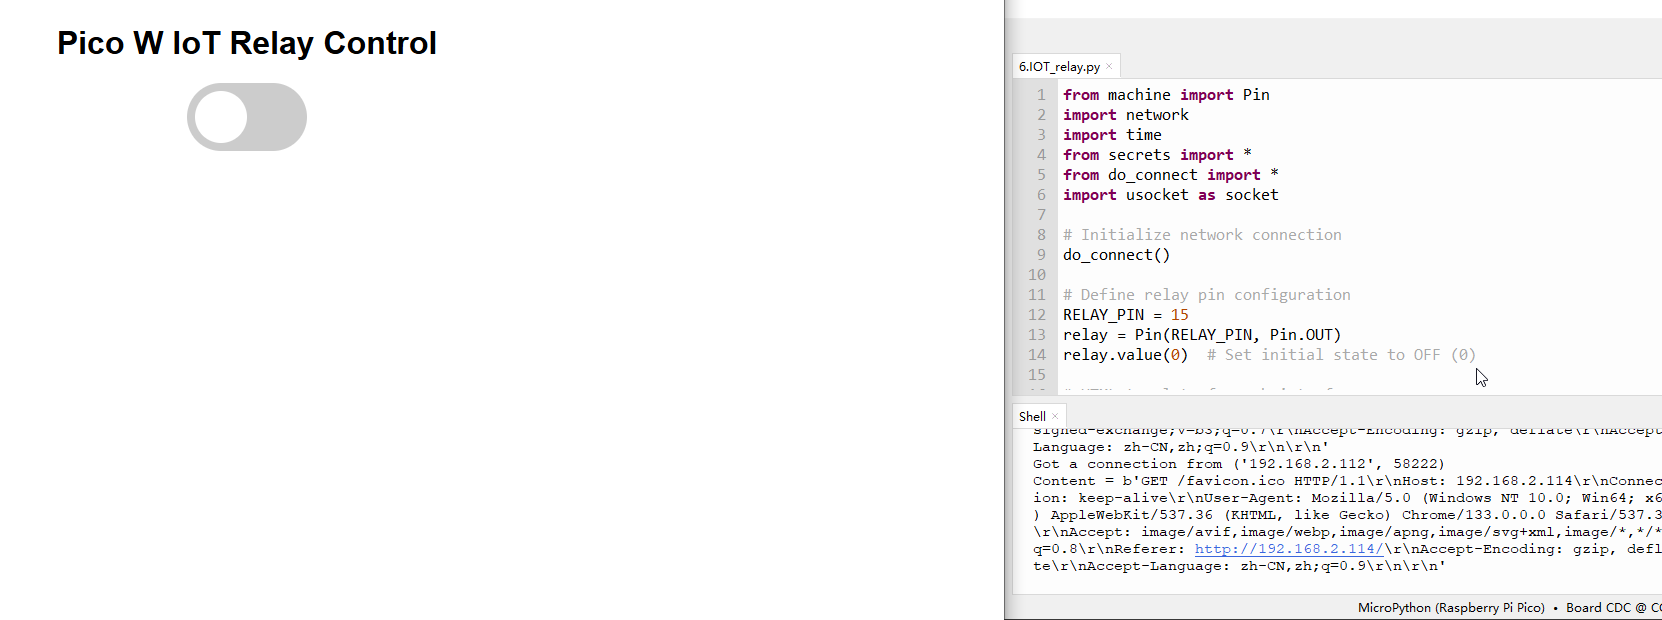
Click ‘Run current script’. After a successful connection, the shell will display the IP address of the Pico W. You can then enter the IP address in your browser to see the webpage, where you can use the switch above to control the relay and thus turn the LED light on and off.
If you want this script to be able to boot up, you can save it to the Raspberry Pi Pico W as main.py.
The following is the program code:
from machine import Pin
import network
import time
from secrets import *
from do_connect import *
import usocket as socket

# Initialize network connection
do_connect()

# Define relay pin configuration
RELAY_PIN = 15
relay = Pin(RELAY_PIN, Pin.OUT)
relay.value(0)  # Set initial state to OFF (0)

# HTML template for web interface
# Contains CSS for switch styling and JavaScript for AJAX requests
HTML_TEMPLATE = """<html>
<head>
<meta name="viewport" content="width=device-width, initial-scale=1">
<style>
body{{font-family:Arial; text-align: center; margin: 0px auto; padding-top:30px;}}
.switch{{position:relative;display:inline-block;width:120px;height:68px}}
.switch input{{display:none}}
.slider{{position:absolute;top:0;left:0;right:0;bottom:0;background-color:#ccc;border-radius:34px}}
.slider:before{{position:absolute;content:"";height:52px;width:52px;left:8px;bottom:8px;background-color:#fff;-webkit-transition:.4s;transition:.4s;border-radius:68px}}
input:checked+.slider{{background-color:#2196F3}}
input:checked+.slider:before{{-webkit-transform:translateX(52px);-ms-transform:translateX(52px);transform:translateX(52px)}}
</style>
<script>
function toggleCheckbox(element) {{
var xhr = new XMLHttpRequest();
xhr.open("GET", "/?relay=" + (element.checked ? "on" : "off"), true);
xhr.send();
}}
</script>
</head>
<body>
<h1>Pico W IoT Relay Control</h1>
<label class="switch">
<input type="checkbox" onchange="toggleCheckbox(this)" {state}>
<span class="slider"></span>
</label>
</body>
</html>"""

def web_server():
    """
    Generate HTML response based on current relay state
    Returns: HTML content with current relay state
    """
    relay_state = 'checked' if relay.value() == 1 else ''
    return HTML_TEMPLATE.format(state=relay_state)

def handle_request(conn):
    """
    Handle incoming HTTP requests
    Args:
        conn: Socket connection object
    """
    # Receive and process HTTP request
    request = conn.recv(1024)
    request = str(request)
    print('Content = %s' % request)

    # Process relay control commands
    if '/?relay=on' in request:
        print('RELAY ON')
        relay.value(1)
    elif '/?relay=off' in request:
        print('RELAY OFF')
        relay.value(0)

    # Send HTTP response
    response = web_server()
    conn.send(b'HTTP/1.1 200 OK\n')
    conn.send(b'Content-Type: text/html\n')
    conn.send(b'Connection: close\n\n')
    conn.sendall(response.encode('utf-8'))
    conn.close()

# Initialize socket server
s = socket.socket(socket.AF_INET, socket.SOCK_STREAM)
s.bind(('', 80))  # Bind to port 80
s.listen(5)       # Listen for up to 5 connections

print('Server started, waiting for connections...')

# Main loop to handle incoming connections
while True:
    try:
        # Accept new connection
        conn, addr = s.accept()
        print('Got a connection from %s' % str(addr))
        handle_request(conn)
    except OSError as e:
        print('Connection closed: %s' % e)
Phenomenon