2.4 LCD Displayer
Time to add a display to our projects! An LCD1602 is like a tiny digital billboard that can show text messages - perfect for displaying sensor readings, status messages, or user interfaces. It can show 32 characters total: 2 rows with 16 characters each.
Why I²C LCD? Regular LCDs need 6+ wires, but our I²C version needs only 2 wires (SDA + SCL)! This saves precious GPIO pins for other components. Think of I²C as a “highway” where multiple devices can share the same communication path.
We’ll display custom messages that appear and disappear in sequence - like a simple animation!
Component List
Raspberry Pi Pico W x1
MicroUSB cable x1
830 Tie-Points Breadboard x1
LCD1602 IIC x1
Jumper Wire Several
Component knowledge
LCD1602
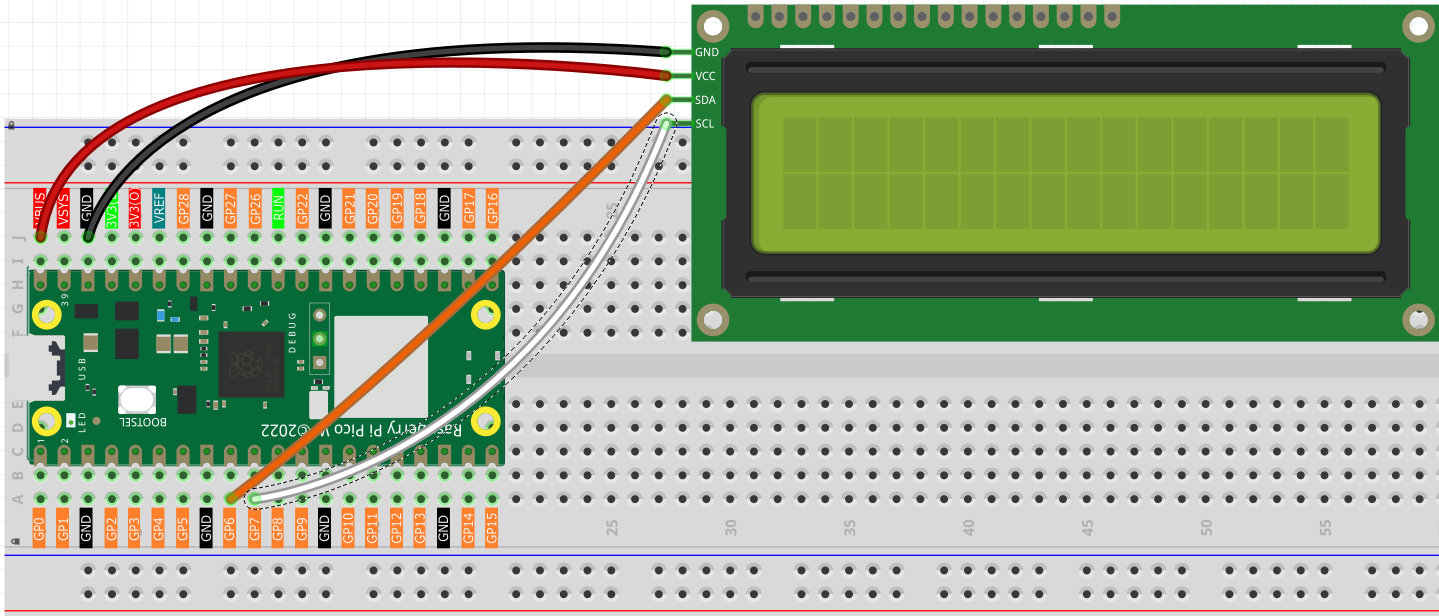
Connect
Code
Note
Open the
2.4_lcd_displayer.pyfile under the path ofUltimate-Starter-Kit-for-Pico-W\Python\1.Projector copy this code into Thonny, then click “Run Current Script” or simply press F5 to run it.Don’t forget to click on the “MicroPython (Raspberry Pi Pico)” interpreter in the bottom right corner.
After running the code, watch the LCD screen come alive! First “From Lafvin” appears, then clears, followed by “Hello” on the first line and “World!” on the second line. The text sequence demonstrates cursor positioning and display timing - perfect for creating informative project displays!
The following is the program code:
"""
LCD1602 Display Demo

This program demonstrates basic LCD1602 operations:
- Display text messages
- Clear the screen
- Create new lines
"""

# Import required libraries
from machine import I2C, Pin  # For I2C communication and pin control
from lcd1602 import LCD       # For LCD1602 display control
import time                   # For time delays

# Hardware pin configuration
SDA_PIN = 6                  # I2C data pin (SDA)
SCL_PIN = 7                  # I2C clock pin (SCL)
I2C_FREQUENCY = 400000        # I2C communication frequency (400kHz)

def setup_lcd():
    """
    Initialize and setup the LCD display
    Returns: LCD object ready for use
    """
    # Initialize I2C communication
    # Note: Reinitializing I2C helps clear any bus state issues
    i2c = I2C(1, sda=Pin(SDA_PIN), scl=Pin(SCL_PIN), freq=I2C_FREQUENCY)

    # Small delay to let I2C bus stabilize (prevents communication errors)
    time.sleep(0.1)

    # Create an LCD object for interfacing with the LCD1602 display
    lcd = LCD(i2c)

    return lcd

def display_first_message(lcd):
    """
    Display the first message on LCD
    Args: lcd - LCD object
    """
    print("Displaying first message...")

    # Display the first message on the LCD
    # Use '\n' to create a new line
    message = "From Lafvin"
    lcd.message(message)

    # Wait for 2 seconds
    time.sleep(2)

    # Clear the display
    lcd.clear()

def display_second_message(lcd):
    """
    Display the second message on LCD
    Args: lcd - LCD object
    """
    print("Displaying second message...")

    # Display the second message on the LCD
    # Note: '\n' creates a new line, spaces align the text
    message = "Hello\n       World!"
    lcd.message(message)

    # Wait for 5 seconds
    time.sleep(5)

    # Clear the display before exiting
    lcd.clear()

def main():
    """
    Main function that runs the LCD demo
    """
    print("=== LCD1602 Display Demo ===")
    print("Starting LCD demonstration...")

    # Step 1: Setup the LCD display
    lcd = setup_lcd()

    # Step 2: Display first message
    display_first_message(lcd)

    # Step 3: Display second message
    display_second_message(lcd)

    print("Demo completed!")

# Run the program
if __name__ == "__main__":
    main()