1.2 Button & LED
In the previous lesson, we made an LED blink automatically. Now we’ll learn something new: how to use a button to control an LED. This adds user interaction to our project for the first time.
We’ll use the Pico’s GPIO pins in a new way: as inputs to read button presses. In the previous lesson, we used GPIO pins as outputs to control the LED. This lesson introduces using GPIO pins as inputs.
This project demonstrates a basic control system: Button (Input) → Pico (Control) → LED (Output).
Component List
Raspberry Pi Pico W x1
MicroUSB cable x1
830 Tie-Points Breadboard x1
Resistor 10KΩ x1
Jumper Wire Several
Button x1
Component knowledge
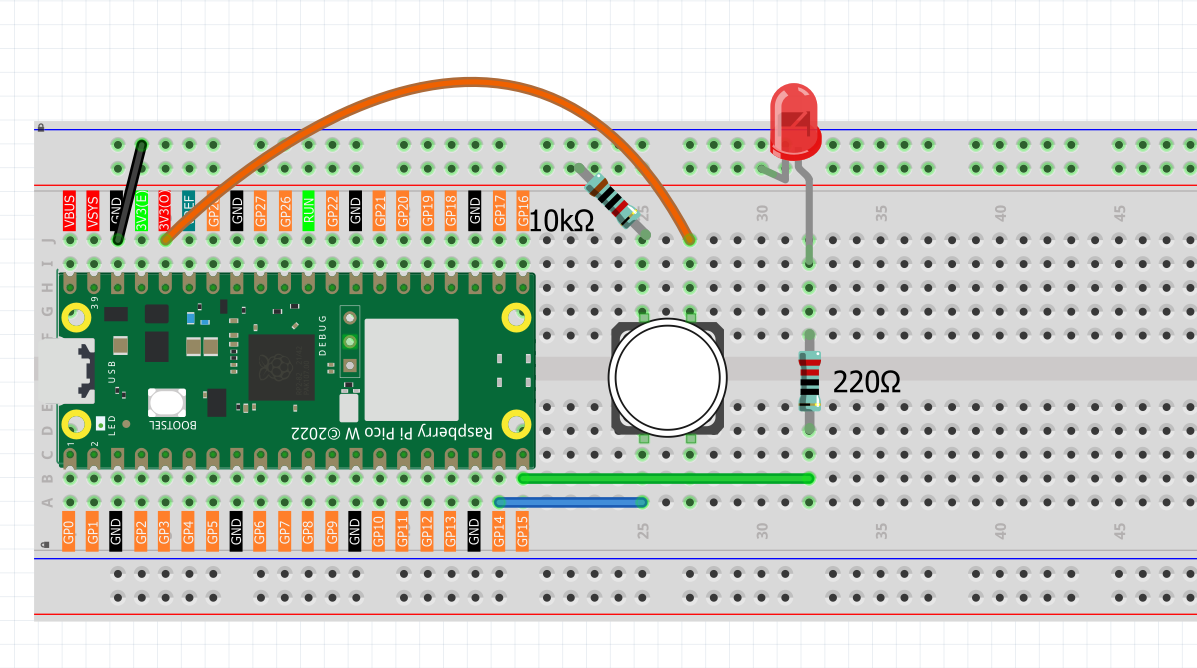
Connect
Code
Note
Open the
1.2_button_led.pyfile under the path ofUltimate-Starter-Kit-for-Pico-W\Python\1.Projector copy this code into Thonny, then click “Run Current Script” or simply press F5 to run it.Don’t forget to click on the “MicroPython (Raspberry Pi Pico)” interpreter in the bottom right corner.
After running the code, when you press the button, the LED will turn on. When you release the button, the LED will turn off.
The following is the program code:
"""
Button Control LED

Turns on and off a LED connected to digital pin 15,
when pressing a pushbutton attached to pin 14.
"""

import machine
import utime

# Constants for pin numbers
BUTTON_PIN = 14         # the number of the pushbutton pin
LED_PIN = 15           # the number of the LED pin

# Variables
button_state = 0       # variable for reading the pushbutton status

# Initialize pins
button = machine.Pin(BUTTON_PIN, machine.Pin.IN)  # pushbutton pin as input
led = machine.Pin(LED_PIN, machine.Pin.OUT)       # LED pin as output

def setup():
    """Initialize the system"""
    print("=== Button Control LED ===")
    print("Press the button to control the LED")
    print("Button: Pin", BUTTON_PIN)
    print("LED: Pin", LED_PIN)
    print("==========================")

    # Ensure LED starts in OFF state
    led.value(0)
    print("System initialized - LED OFF")

def main():
    """Main control loop"""
    global button_state

    setup()

    try:
        while True:
            # Read the state of the pushbutton
            button_state = button.value()

            # Check if the pushbutton is pressed
            # Note: Assuming button pressed = HIGH (1), adjust if needed
            if button_state == 1:
                # Turn LED on
                led.value(1)
            else:
                # Turn LED off
                led.value(0)

            # Small delay for stability
            utime.sleep_ms(10)

    except KeyboardInterrupt:
        print("\nProgram stopped.")
        print("Turning off LED...")
        led.value(0)
        print("Button control ended.")

if __name__ == "__main__":
    main()