2.5 Motor & Fan
Time to add movement to our projects! DC motors can spin fans, wheels, conveyor belts, or any rotating mechanism. Unlike LEDs that just light up, motors create mechanical motion - they can push, pull, spin, and move things in the real world!
We’re using a TA6586 motor driver chip that lets us control both speed and direction. Think of it as a “motor remote control” that can make the motor spin clockwise, counterclockwise, or stop completely.
Why need a motor driver? Motors are hungry for power! The Pico can’t provide enough current safely, so the TA6586 acts like a power amplifier.
Component List
Raspberry Pi Pico W x1
MicroUSB cable x1
830 Tie-Points Breadboard x1
TA6586 x1
DC Motor x1
Li-po Charger Module x1
Battery Holder x1
Jumper Wire Several
Component knowledge
TA6586
Li-po Charger Module
DC Motor
How bidirectional motor control works:
Direction Control Logic: - Clockwise: Pin A = HIGH, Pin B = LOW → Current flows one direction - Counterclockwise: Pin A = LOW, Pin B = HIGH → Current flows opposite direction - Stop: Both pins = LOW → No current flows
Safety First: The Li-Po charger module provides clean, regulated power to prevent motor damage and protect your circuit from voltage spikes.
Note
Since DC motors require a high current, we use a Li-po Charger module to power the motor here for safety reasons.
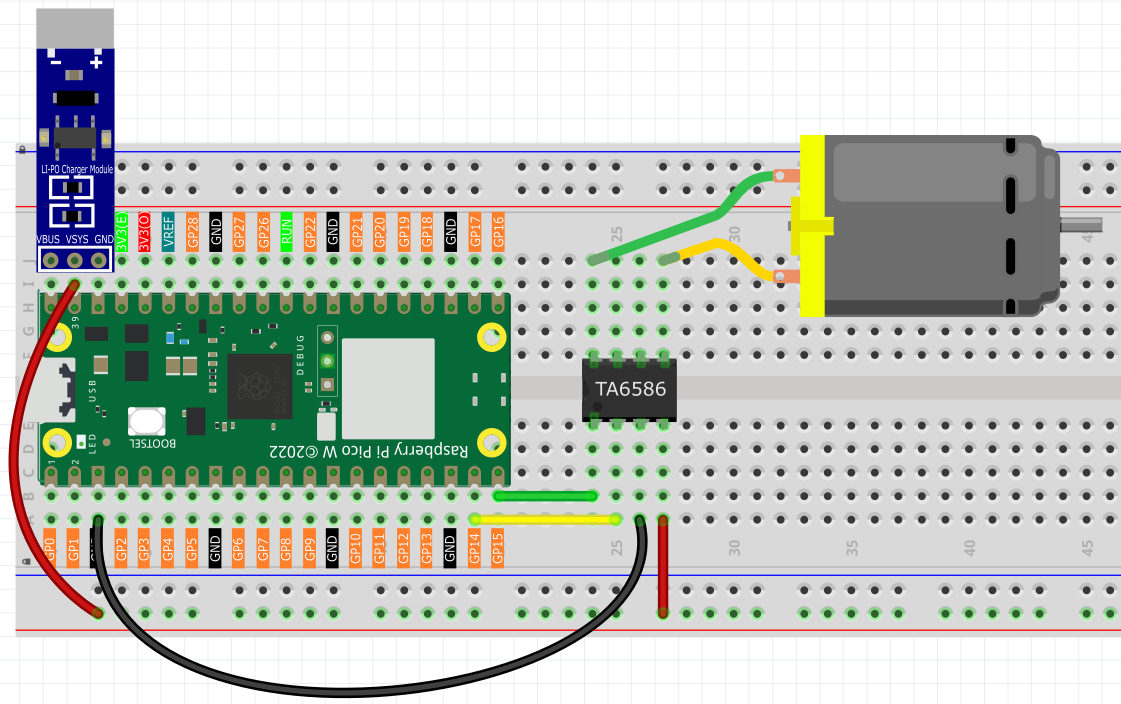
Make sure your Li-po Charger Module is connected as shown in the diagram. Otherwise, a short circuit will likely damage your battery and circuitry.
Connect
Code
Note
Open the
2.5_motor_and_fan.inofile under the path ofUltimate-Starter-Kit-for-Pico-W\Arduino\1.Projector copy this code into Thonny, then click “Run Current Script” or simply press F5 to run it.Or copy this code into Arduino IDE.
Don’t forget to select the board(Raspberry Pi Pico) and the correct port before clicking the Upload button.
After running the code, watch the motor spring into action! It follows a rhythmic pattern: spins clockwise for 1 second, stops for 1 second, spins counterclockwise for 1 second, stops again, then repeats. Perfect for creating oscillating fans, automatic stirrers, or robotic movements!
The following is the program code:
/*
 * DC Motor and Fan Control Project
 *
 * This project demonstrates bidirectional control of a DC motor or fan
 * using digital pins. The motor alternates between clockwise rotation,
 * stop, counterclockwise rotation, and stop in a continuous cycle.
 *
 * Hardware Requirements:
 * - Arduino-compatible board
 * - DC motor or fan
 * - TA6586 motor driver IC
 * - Appropriate power supply for motor (typically 3V-12V)
 */

// Hardware Configuration Constants
#define MOTOR_PIN_A           14    // TA6586 input pin A (connects to IN1)
#define MOTOR_PIN_B           15    // TA6586 input pin B (connects to IN2)

// Timing Constants
#define ROTATION_DURATION_MS  1000  // How long motor runs in each direction (milliseconds)
#define STOP_DURATION_MS      1000  // How long motor stops between direction changes (milliseconds)

/**
 * Arduino Setup Function
 *
 * Initializes the motor control pins as outputs.
 * This function runs once when the Arduino starts up.
 */
void setup() {
  // Configure motor control pins as outputs
  pinMode(MOTOR_PIN_A, OUTPUT);
  pinMode(MOTOR_PIN_B, OUTPUT);

  // Ensure motor starts in stopped state
  stopMotor();
}

/**
 * Arduino Main Loop Function
 *
 * Continuously cycles through motor operations:
 * clockwise → stop → counterclockwise → stop → repeat
 */
void loop() {
  // Run motor clockwise
  rotateClockwise();
  delay(ROTATION_DURATION_MS);

  // Stop motor
  stopMotor();
  delay(STOP_DURATION_MS);

  // Run motor counterclockwise
  rotateCounterclockwise();
  delay(ROTATION_DURATION_MS);

  // Stop motor
  stopMotor();
  delay(STOP_DURATION_MS);
}

/**
 * Rotate Motor Clockwise
 *
 * Sets the motor control pins to rotate the motor in clockwise direction.
 * Pin A is set HIGH and Pin B is set LOW to create the direction signal.
 */
void rotateClockwise() {
  digitalWrite(MOTOR_PIN_A, HIGH);
  digitalWrite(MOTOR_PIN_B, LOW);
}

/**
 * Rotate Motor Counterclockwise
 *
 * Sets the motor control pins to rotate the motor in counterclockwise direction.
 * Pin A is set LOW and Pin B is set HIGH to reverse the direction signal.
 */
void rotateCounterclockwise() {
  digitalWrite(MOTOR_PIN_A, LOW);
  digitalWrite(MOTOR_PIN_B, HIGH);
}

/**
 * Stop Motor
 *
 * Stops the motor by setting both control pins to LOW.
 * This removes power from the motor, causing it to stop spinning.
 */
void stopMotor() {
  digitalWrite(MOTOR_PIN_A, LOW);
  digitalWrite(MOTOR_PIN_B, LOW);
}